A great new recipe I discovered around Thanksgiving offers another use for butternut squash besides the typical soup route. A crowd favorite, this is a nice hearty appetizers that toes the line between sweet and savory.
Ingredients: frozen puff pastry sheet, butternut squash (preferably whole/fresh and sliced to your desired thinness), 1 egg + water, salt, olive oil, fresh sage leaves, honey or maple syrup, parmesan cheese
Preheat the oven 375 and begin by placing the puff pastry sheet on a parchment paper lined cookie sheet. Beat the egg and a tsp of water to make an egg wash and brush it over the puff pastry. Arranged your butternut squash slices evenly over the pastry, overlapping as you see fit.
Cover the squash covered pastry with more parchment paper and another cookie sheet of something with a little weight to press down on the squash before putting it into the oven. As it bakes, the moisture in the squash won't evaporate leaving it dry, but allow for steam cooking. Bake for about 10-15 minutes. When you notice some puffing of the pastry, but not browning on top, you're good.
Remove the top layer of parchment paper and cookie sheet, brush or drizzle with olive oil and return the squash pastry to the oven. Bake for an addition half an hour or so, uncovered, until the squash looks cooked to your doneness (you can poke it with a toothpick or fork to make sure it is soft enough), and the pastry is a light golden brown, but not a burnt mess.
The suggested toppings for the tart are a chili-infused honey, fried sage leaves, and freshly shaved parmesan cheese. When I made this, we did not have honey and one of our diners was not a fan of spicy things, so for the drizzle, we went with maple syrup instead. I wanted the syrup to be thicker though, so in a saute pan I heated a few tablespoons of syrup with about half as much water, cooked to a boil, then simmered while it reduced and thickened. For the fried sage, heat the olive oil in a shallow skillet over medium-high heat and add the fresh sage, one leaf at a time. It will bubble/pop because of the moisture in the leaves, and it will fry quickly so remove the leaves with tongs after about 5-10 seconds on each side in the oil.
Top the tart with the honey or syrup drizzle, the fried sage, and the cheese (preferably freshly shaved parmesan, but we only had pre-grated). Slice into individual squares and serve!
Chronicling my daily meals to showcase recipes, techniques, and restaurant fares. This is a blog to explore my love of all things edible and the processes behind them.
Showing posts with label cheese. Show all posts
Saturday, February 2, 2013
Sunday, October 7, 2012
Stuffed Cabbage
So first up, cut the cabbage in half and add the halves to boiling water. You will lose the integrity of some of the leaves for wrapping, so some wraps may involve 2 leaves instead of 1. But do be sure you split the cabbage in half lengthwise (so the stalk gets cut in half, otherwise every leaf will be cut in half.
Meanwhile, prepare your filling. I cooked brown rice according to package instructions, and sauteed some red onions, mushrooms, and garlic in a little olive oil.
Once softened I removed the veggies to the sauce pan containing the rice and sauteed my chicken which I had chopped into 1/2 inch cubes.
Once the chicken was fully cooked, I transferred it too to the rice and veggies and made sure everything was nicely mixed. I also added diced fresh tomatoes, chopped scallions, salt, and pepper.
By this point, the cabbage was fully boiled (at least 20 minutes, but longer depending on how cooked you like your cabbage). Carefully remove the hot cabbage from the water and when cool enough to handle, separate the leaves into individual "bowls" for stuffing. To each leaf I added a spoonful of my stuffing and topped with freshly grated cheese.
At this point, roll them like a burrito and the next step is at your discretion. I placed them seam-side down back into the skillet to char a little bit, but also heat through. You could also put them in a baking dish and put them in the oven for 10-20 minutes. I added a little broth to get a little steaming action going on, but if you have a sauce prepared, such as a tomato sauce, creamy bechamel, or something else you prefer, you can cook the wraps in the sauce.
To serve, I plated my wraps and added a dollop of sour cream (which is often served with stuffed cabbage at Russian restaurants, only it is a slightly different consistency than the sour cream available in US supermarkets).
Sunday, June 17, 2012
Shrimp Sandwich
I'm a fan of a good sandwich, and when you're lucky enough to get fresh ingredients and good bread, you're pretty much guaranteed a tasty sandwich. This particular lunchtime delight features shrimp, avocado, bacon, tomato, goat cheese, mayo, and a little parmesan for good measure on Tuscan Pane bread.
Toast your bread. I toasted one slice with some parmesan cheese to melt into it. Spread your condiments of choice on each side. Slice your toppings and layer away. I did avocado on one side, since the avocado would stick well to the bread when it came time to flip. Then the other side I started with the bacon and weighted it down with the tomato slices. Next I topped with the shrimp that I quickly poached to cook through beforehand. I added the goat cheese for the final touch, combined the two sides, and sliced on a bias down the middle.
Tags:
avocado,
bacon,
bread,
cheese,
mayonnaise,
sandwiches,
shrimp,
tomatoes
Saturday, June 9, 2012
Burritos
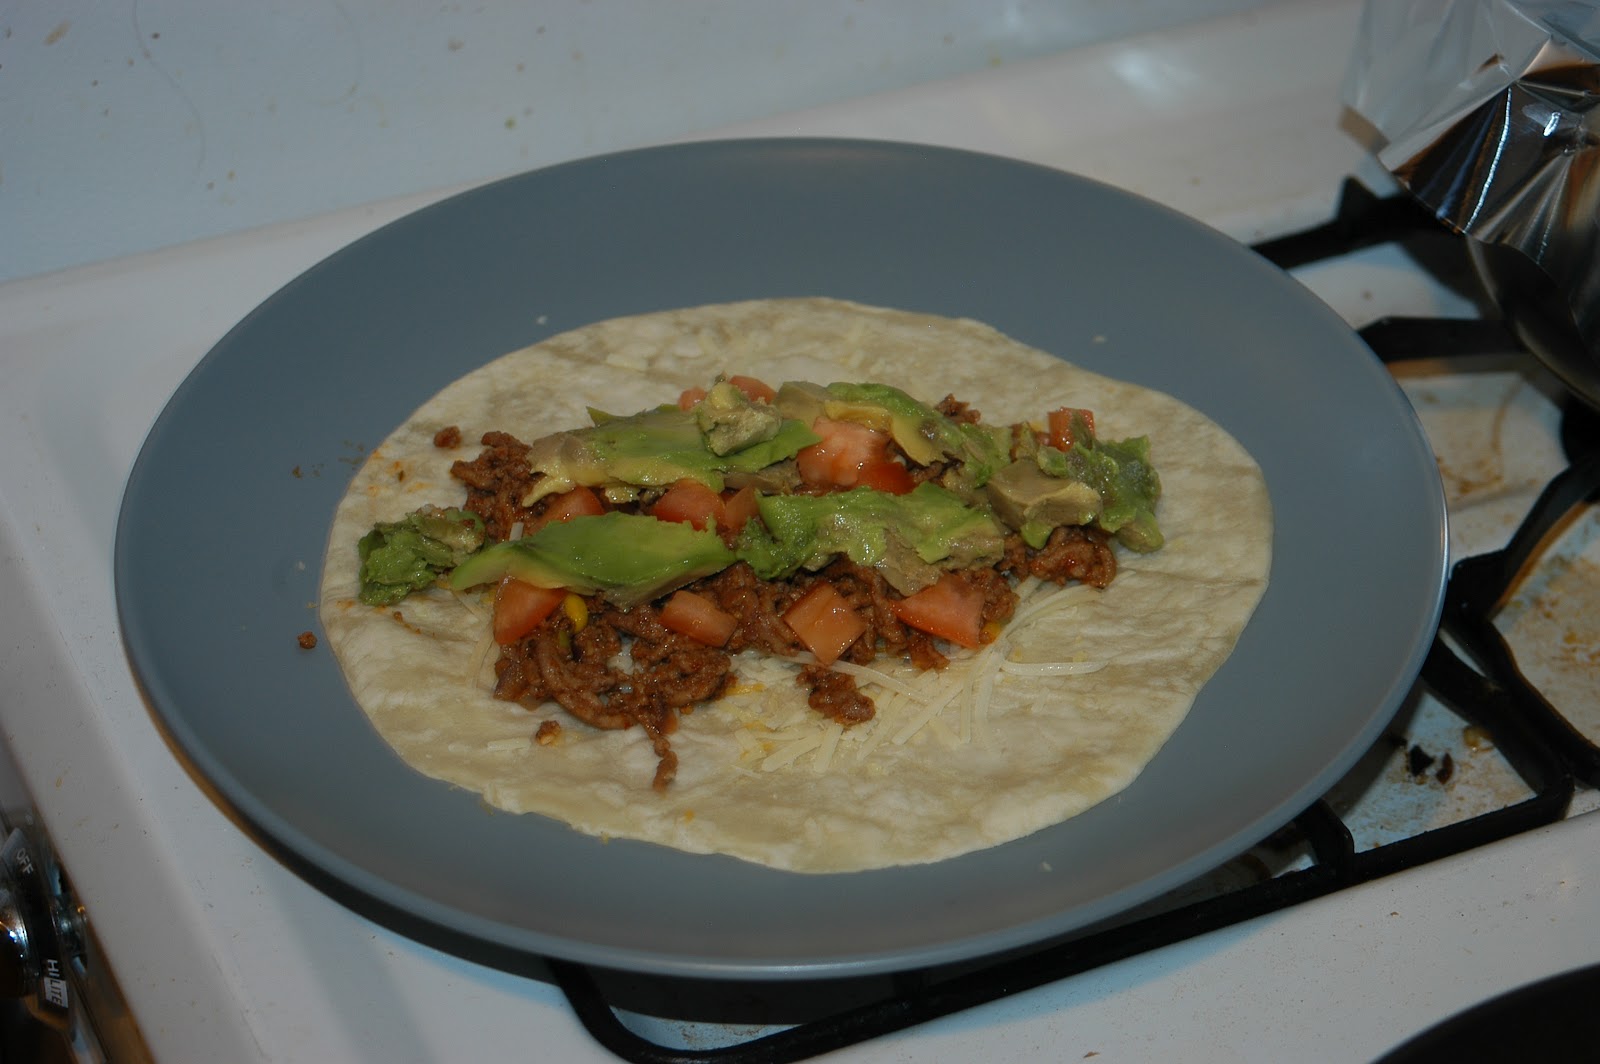
What's better than a meal you can eat with your hands, and is teeming with flavors and ingredients? For when you don't want to be constrained by forks, burritos are a sure bet. If you really want to do these right, I recommend getting large, thin four tortillas that are easily foldable. I did not have those. All you need to do next is choose your fillings and go to town. I went with ground beef.
For this meal I began by sauteing the ground beef with some red onions and corn. Once fully cooked I added the taco seasoning.
If you don't mind the extra fat contact, skip the part where the taco seasonings tell you to drain the fat and add water to the beef. It tastes way juicier if you use the meat fat. But if you don't want a complete calorie bomb for dinner, go ahead and ditch the fatty juices.
Once your meat is cooked, assembly is all that is left. To prepare the tortillas, put them in the oven on low (200 degrees or so) to warm and soften them. You can do this while the meat is cooking. Then grab a plate and throw on your toppings.
Add the cheese to the warm tortilla so it will slightly melt and then be melted again by the heat of the beef.
If adding beans or rice, add them next before the meat. I was lacking beans and I also forgot about the rice until the end so it was added a little out of order.
Cold ingredients come next. Starting with the tomatoes. And followed by the fresh avocado.
For this meal I began by sauteing the ground beef with some red onions and corn. Once fully cooked I added the taco seasoning.
If you don't mind the extra fat contact, skip the part where the taco seasonings tell you to drain the fat and add water to the beef. It tastes way juicier if you use the meat fat. But if you don't want a complete calorie bomb for dinner, go ahead and ditch the fatty juices.
Once your meat is cooked, assembly is all that is left. To prepare the tortillas, put them in the oven on low (200 degrees or so) to warm and soften them. You can do this while the meat is cooking. Then grab a plate and throw on your toppings.
Add the cheese to the warm tortilla so it will slightly melt and then be melted again by the heat of the beef.
If adding beans or rice, add them next before the meat. I was lacking beans and I also forgot about the rice until the end so it was added a little out of order.
Cold ingredients come next. Starting with the tomatoes. And followed by the fresh avocado.
You can also do pico de gallo and guacamole in lieu of tomatoes and avocado, but at this stage add whatever veggies you want. Lettuce works too.
Here's the rice I forgot to add earlier.
The final touch is anything saucy. I added sour cream and some salsa verde. Then all that is left is to fold and wrap. Fold the two sides in so they touch the toppings. Grab the back flap and pull it over and around the innards, pushing the fillings inside as much as possible. Continue to roll until your wrap is complete. As you can see in the first image, my burritos were a tad overstuffed for these tortillas, so I had to keep one end open. As long as you have one burrito butt to avoid food getting all over your hands you should be good.
Tags:
avocado,
cheese,
corn,
ground beef,
Mexican,
red onion,
rice,
sour cream,
tomatoes,
tortillas
Tuesday, February 28, 2012
Pesto Chicken Sandwich
Today I have yet another delicious lunchtime sandwich option for you all. I was craving some chicken pesto the other night, but decided it was more of an afternoon meal, so the next day I went to town. Pretty much all you need for this is chicken and pesto sauce and the rest of the accompaniments are up to you. I would've liked some avocado or maybe some lettuce or fresh tomato, but alas you use what you have, and here is what I made given the ingredients in my fridge. Granted, it was still obviously a delicious and decadent sandwich.
1. Toast your bread. I went with sourdough.
2. Cook your bacon. I did this in a pan on the stove.
3. Cook your chicken. I used two chicken breast tenders which I first seared in the bacon grease, but then ultimately poached in a little broth/water combo. This was to make sure it would cook through and remain moist. When it was pretty much done, most of the liquid had evaporated so I spread a thick slab of pesto on top of the chicken, put the lid on the saucepan and cooked another 3-5 minutes.
4. Assemble.
On one slice of the bread I placed some red onion slices, covered with my bacon strips, and crumbled some herbed goat cheese on top. On the other slice of bread I spread a coat of mayonnaise, placed my two chicken slices on top, and shaved some fresh parmesan cheese onto the still hot chicken so it would melt.
Carefully flip over one of the sides of the sandwich. Press together lightly, slice on the bias, and enjoy this cheesy, pesto-ey, meaty deliciousness.
1. Toast your bread. I went with sourdough.
2. Cook your bacon. I did this in a pan on the stove.
3. Cook your chicken. I used two chicken breast tenders which I first seared in the bacon grease, but then ultimately poached in a little broth/water combo. This was to make sure it would cook through and remain moist. When it was pretty much done, most of the liquid had evaporated so I spread a thick slab of pesto on top of the chicken, put the lid on the saucepan and cooked another 3-5 minutes.
4. Assemble.
On one slice of the bread I placed some red onion slices, covered with my bacon strips, and crumbled some herbed goat cheese on top. On the other slice of bread I spread a coat of mayonnaise, placed my two chicken slices on top, and shaved some fresh parmesan cheese onto the still hot chicken so it would melt.
Carefully flip over one of the sides of the sandwich. Press together lightly, slice on the bias, and enjoy this cheesy, pesto-ey, meaty deliciousness.
Wednesday, December 21, 2011
Baked Eggs
I've been wanting to attempt baked eggs for awhile now, but haven't had the proper ramekins, so this holiday season provided the perfect opportunity to try my hand at this dish. Basically you crack eggs into ramekins, surround with a little milk or cream (to avoid burning), and bake for 15 minutes or so. I of course wanted more than just eggs so I layered potatoes, cheese, bacon, onions, and mushrooms.
Begin by cooking your bacon and once rendered remove to paper towels to drain. Slice your potatoes (I used peeled fingerlings) and add them with some minced garlic to the bacon grease to cook.
Once your potatoes are cooked to your liking, start assembling them in your ramekins.
Next up is cheese.
Followed by the bacon.
Meanwhile, saute some onions and mushrooms in the leftover bacon grease (add more butter if needed) and once softened add those to the dishes.
Make room for your cracked eggs in the center of your mount of food.
Finally add a tablespoon of milk or cream atop the eggs. Place on a cookie sheet and bake for about 15 minutes at 325 F.
These ramekins were a little shallow for all the ingredients I tried to cram in them, otherwise the eggs might not have looked so separated from everything else, but it didn't diminish from the deliciousness. Everyone had an individual serving of breakfast goodness all in one place and the baked eggs were an interesting consistency different than what you'd get from frying or poaching.
Wednesday, December 7, 2011
Bacon Wrapped Goat Cheese Stuffed Baked Pears
I was recently gifted pears, which is interesting because I'm not so much a pear eater. I consulted google to determine what I could do with these pears that would possibly appease my fruit-hating palate, and lo-and-behold....bacon was the answer! Big surprise. This recipe had the makings of all the things I love: bacon and goat cheese. The pear became an afterthought, which was fine by me.
Begin by preheating your oven to 350 F, halve your pears, and remove the pits, leaving a nice bowl for your cheese. Place the pear halves on a cookie sheet, fill the scooped out insides with herbed goat cheese, and wrap with raw bacon. So maybe the recipe calls for a single slice of bacon, but obviously that wasn't enough, so I went for two.
Drizzle the pears with a little olive oil and salt and pepper and bake for about 30 minutes (more or less depending on pear size).
Once done, serve over a bed of greens. I used mesclun, but you can also use arugula or whatever you prefer. We made a mild vinaigrette to drizzle over the lettuce before we topped with the pears and drizzled with a little honey. The juices from the pears, the fat from the bacon, and the sweetness of the honey actually combined pretty well with the greens and cheese and made for a surprisingly delicious pear salad...though that could be all the bacon's doing.
I had some leftovers so I reheated the pears in the toaster oven to re-crisp the bacon, and one morning I served this for breakfast over a fried egg. Not bad for a fruit.
Begin by preheating your oven to 350 F, halve your pears, and remove the pits, leaving a nice bowl for your cheese. Place the pear halves on a cookie sheet, fill the scooped out insides with herbed goat cheese, and wrap with raw bacon. So maybe the recipe calls for a single slice of bacon, but obviously that wasn't enough, so I went for two.
Drizzle the pears with a little olive oil and salt and pepper and bake for about 30 minutes (more or less depending on pear size).
Once done, serve over a bed of greens. I used mesclun, but you can also use arugula or whatever you prefer. We made a mild vinaigrette to drizzle over the lettuce before we topped with the pears and drizzled with a little honey. The juices from the pears, the fat from the bacon, and the sweetness of the honey actually combined pretty well with the greens and cheese and made for a surprisingly delicious pear salad...though that could be all the bacon's doing.
I had some leftovers so I reheated the pears in the toaster oven to re-crisp the bacon, and one morning I served this for breakfast over a fried egg. Not bad for a fruit.
Tuesday, November 15, 2011
Chicken Pesto Crepes
The other night I was craving crepes, but not interested in going to a restaurant, so I obviously had to make them at home. Turns out they're quite simple and quick. Prepare your batter, then prepare your fillings. Cook the batter, fill the crepe, eat.
Crepe Batter: 1 egg, 1/4 cup flour, 1/3 cup milk
Fillings: Chicken, red onion, corn, pesto sauce, cheddar and goat cheese
That amount of crepe batter made 3 crepes. Mix all the ingredients and make sure there aren't any lumps. Then make sure your filling is completely cooked. I sauteed the chicken, onion, and corn in a skillet and then added pesto sauce. Set aside.
Heat your nonstick skillet over medium heat and lightly butter the bottom. Add 1/3 of your crepe batter and swirl it around the entire bottom of your pan.
Once partially cooked, but obviously cooked through on the bottom (about 1 minute), flip.
At this point, add your filling mixture. Like with a quesadilla, I start with the cheese so that it will melt and then put my chicken mixture over it. Once melted, transfer to a plate by folding however you'd like. I went for burrito-style rolls, but you can do triangles, folds, whatever your heart desires.
Saturday, October 29, 2011
Pasta Primavera
As a child, nothing on the pasta menu sounded more gross than a bland pasta surrounded by veggies. Hence, I don't think I've ever knowingly ordered pasta primavera. But I guess when you're an adult you realize vegetables don't have to taste bad, so I decided to combine a smorgasbord of fresh ingredients to make a delightful pasta that the child version of me wouldn't hate either.
Ingredients: Garlic, Onion, Zucchini, Asparagus, Mushrooms, Corn, Spinach, Shrimp
Sauce: White Wine, Broth, Goat Cheese, Parmesan Cheese, 1tsp Flour
So i basically chopped all my veggies. In a little bit of olive oil I sauteed the garlic and onion. After 3-5 minutes I added the asparagus, zucchini, and mushrooms. Once thoroughly cooked I moved the veggies to the side and added a little flour to create a roux. I then added the white wine (I probably used about 1/2 cup). To cut the strong flavor of a wine sauce I added some chicken broth to also reduce/thicken.
At this point I added the raw shrimp, corn, and spinach to cook through. I added goat cheese to the sauce last, then threw on the cooked rigatoni. I mixed everything well, poured in a bowl, garnished with parmesan and felt like a good kid for eating my veggies. Since we know I love cream sauces, using cheese and wine/broth as a base rather than cream itself gave me the same thickening effect, but with a little less guilt. Highly recommended.
Ingredients: Garlic, Onion, Zucchini, Asparagus, Mushrooms, Corn, Spinach, Shrimp
Sauce: White Wine, Broth, Goat Cheese, Parmesan Cheese, 1tsp Flour
So i basically chopped all my veggies. In a little bit of olive oil I sauteed the garlic and onion. After 3-5 minutes I added the asparagus, zucchini, and mushrooms. Once thoroughly cooked I moved the veggies to the side and added a little flour to create a roux. I then added the white wine (I probably used about 1/2 cup). To cut the strong flavor of a wine sauce I added some chicken broth to also reduce/thicken.
At this point I added the raw shrimp, corn, and spinach to cook through. I added goat cheese to the sauce last, then threw on the cooked rigatoni. I mixed everything well, poured in a bowl, garnished with parmesan and felt like a good kid for eating my veggies. Since we know I love cream sauces, using cheese and wine/broth as a base rather than cream itself gave me the same thickening effect, but with a little less guilt. Highly recommended.
Sunday, October 9, 2011
Rice and Beans
This was one of those "what can I throw together with existing ingredients, but that is very dense because I'm very hungry" meals. Lacking tortillas, I figured I could make what I would normally put in a burrito, but eat it like a stew-y mush.
Rice and beans. A good starting point. I only had brown basmati rice, though, so we'll call this a bit of a fusion dish. Basically I cooked the rice according to the directions. In a separate skillet I heated a little olive oil to cook the garlic and onions. Then I added a can of black beans, which I partially drained. As the beans cooked, the liquid diminished, so I thought I'd maybe treat this like a black bean soup, and I added some chicken broth, which too cooked off eventually. I added the sliced chicken to basically poach in the liquid, and once no longer pink I added the rice. I now had a soupy mixture, so I added the juice of 1/2 a lime and cooked until the liquid was reduced completely (only about five minutes or so). To finish it off I added a bunch of fresh cilantro and scallions, poured it in a bowl, and melted some cheese on top. It definitely did the trick and filled me up.
Sunday, July 17, 2011
Quinoa Salad with Shrimp
What? Salad for dinner again? Yeah, don't worry, I'm not turning healthy, as evidenced by the bacon overload. But the first time I sampled quinoa it was in a salad and I was sold, so rather than serve it as a side dish, I present to you quinoa as the main event. Perhaps this would make a great lunch salad.
This one is pretty simple. As you may be able to tell, I was lacking in the lettuce department, so it's heavy on the quinoa, light on the greens. I cooked the quinoa in chicken broth and threw the raw shrimp and frozen corn kernels into the pot to cook together. I created a dressing with olive oil, red wine vinegar, salt and pepper, and cilantro. To that I added the cooked quinoa, shrimp, and corn and mixed to coat. I added the lettuce, chopped red onion, herbed goat cheese, and of course the crumbled bacon. And there you have it. Add quinoa to any of your favorite salads and you'll get a nice texture addition. Though you probably want to add a lot less than I did if you're just using it as an accent flavor.
Wednesday, July 13, 2011
The Art of the Omelet
| with a dollop of herbed goat cheese on top |
Omelets are my go-to weekend brunch item. Having people over? Made to order omelets. It's kind of my thing. So being a self-proclaimed omelet aficionado I have found there tend to be 2 schools of omeleteers - the insiders and the mix-ins. I myself am a mix-in.
The insiders prepare the eggs to doneness, add the fillings at the very end and fold over. Perhaps this is what you traditionally envision an omelet to be. I, however, have found the taste to be much more appealing when the flavors get a chance to infuse with the egg. Ingredients that I want to have cooked, such as mushrooms, onions, meat, etc., cook in the pan and the eggs are added to the ingredients. That way the mix-ins are combined with the egg, ensuring that each bite has a little something different. I'll put cheese strictly in the middle, and certainly am not averse to throwing more mix-ins/toppings into the center of the omelet, but I like my eggs to also have some surprises lurking within. You may think of this as more of a scramble, but since the omelet ends up folded over and the egg is a single entity, I call it an omelet.
I digress. A very important first step to any good omelet is the preparation of the eggs. I typically make 2-egg omelets. Crack your eggs into a small mixing bowl and add milk. About 1-2 tbsps should do for 2 eggs. I eyeball it. Add some salt and pepper and stir.
You want to make sure you have a nice homogenous mixture of yolk, white, and milk, but don't go overbeating. If you want to add any dried or fresh herbs to your eggs, this is the stage I like to add them as well.
Next, cook whatever fillings you will be using in a nice omelet-sized skillet. Nonstick is great for a nicer looking omelet. My pan is old and not very omelet friendly, but it's the perfect size! As should be expected by now, I typically start by cooking the bacon. Once done, I remove to paper towels, but then I use the bacon grease to saute my veggies. If you are averse to bacon, or perhaps want something feigning healthiness, use butter.
Once your veggies are sauteed to your likeness, add your scrambled egg/milk mixture. You'll get a nice even coating of the pan and hopefully there will be a nice distribution of your veggies.
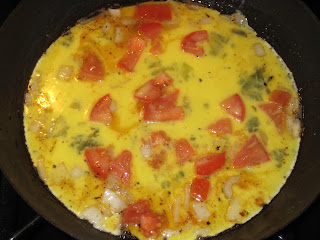
| this omelet appears to contain onions and tomatoes |
I used to think a good omelet was one whose integrity was never disturbed following the addition of the eggs to the pan. It would often take awhile to cook through entirely, but I didn't want to disturb the beautiful flat egg pancake I had created. I often covered the pan with a lid to help cook, but this was getting tedious. I then learned that omelets actually taste exactly the same even if they're roughed up a little around the edges. Using a nonstick, heatproof spatula, it's ok to push the cooked egg at the edges into the center and allow the still uncooked egg to ooze into this previously occupied space. Sure you get a lumpy omelet in some places, but your egg cooks evenly and quickly.
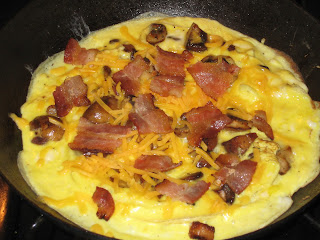
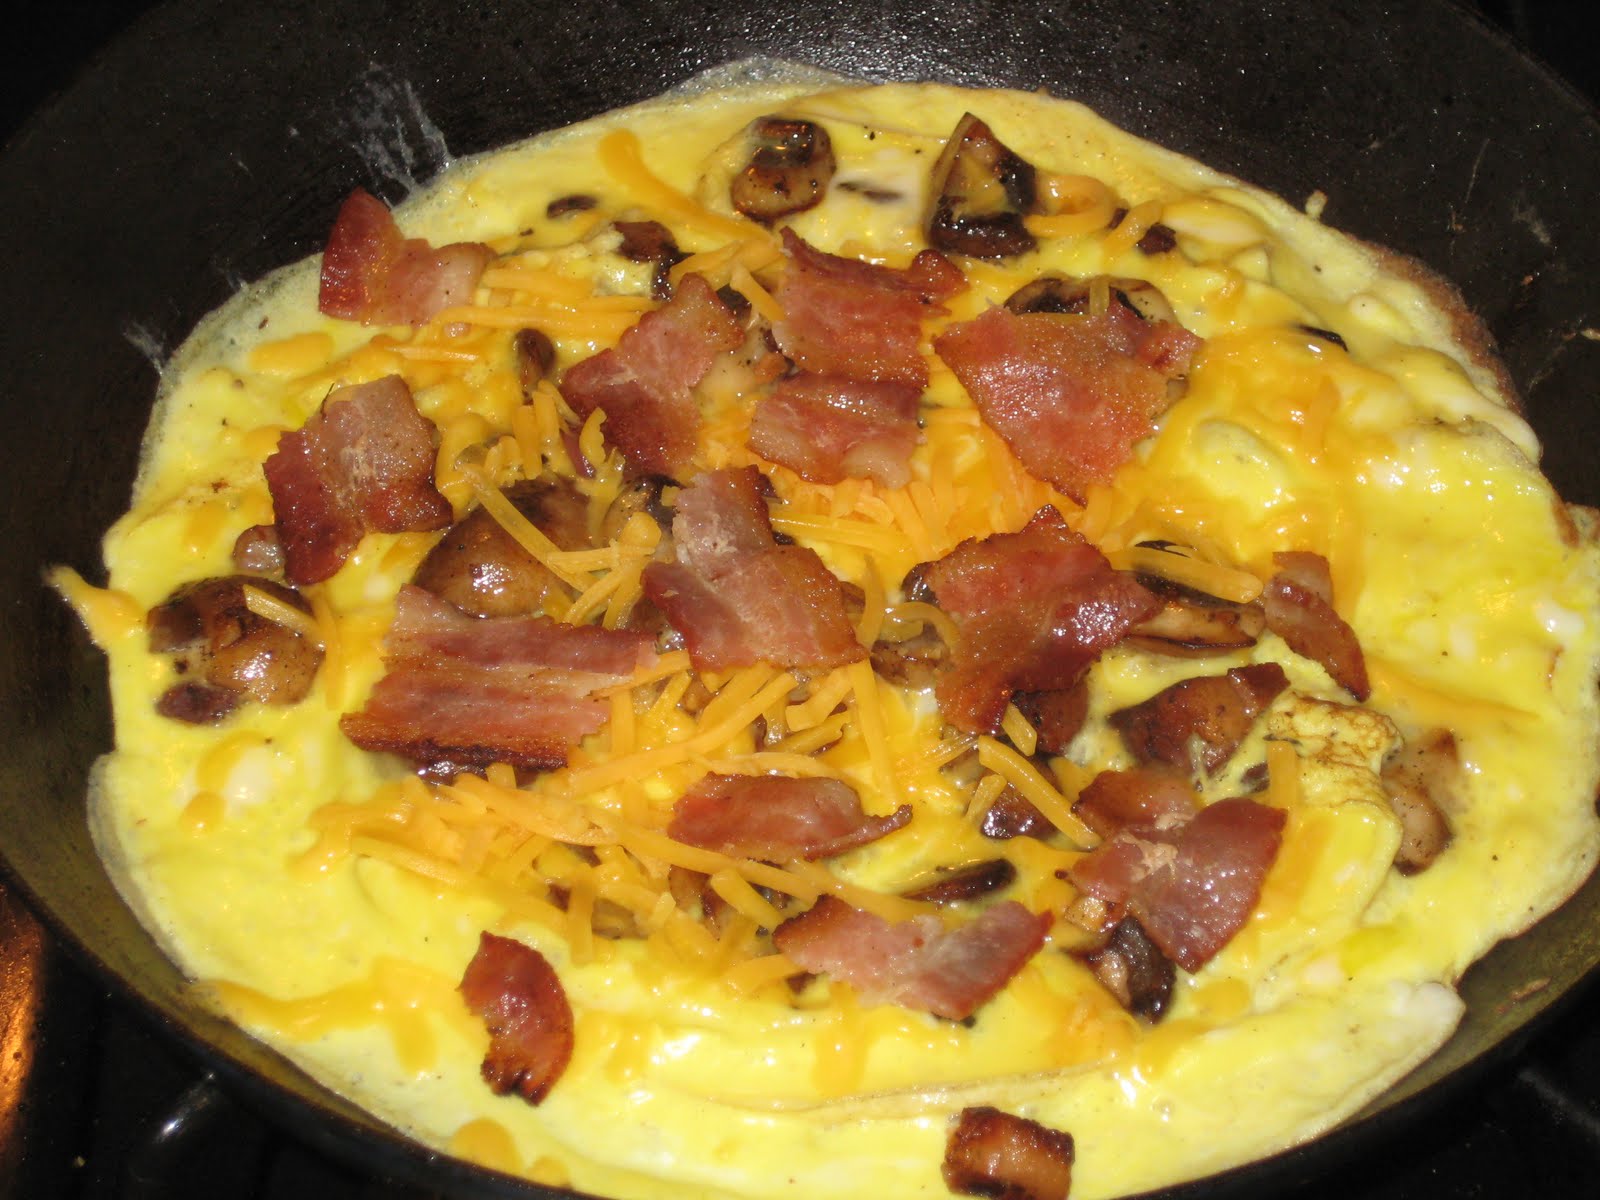
| this omelet has onions, mushrooms, bacon, and cheese |
Once the omelet is about 90% done, add your center toppings. For me this will include the bacon and most definitely the cheese. I can't have an omelet without cheese. Scallions or chives are good at this point. Avocados and tomatoes are also crowd favorites.
Finally, it's time to slide the omelet out of the skillet and fold it over on the plate. You can fold it in the skillet if you'd like, but i've always been one to slide it off the pan half way and with a flip of the wrist let the top half fold over. The lower your heat, slicker your pan, and shorter your cooking time, the less brown the finished outside of the omelet is. And worst case scenario, if you mess up an omelet, you have a delicious scramble, still a meal that will certainly impress your guests when they've just woken up.
Wednesday, July 6, 2011
Shrimp Quesadillas with Mango Salsa
This was the featured dinner item at my 4th of July shindig this year. We spent all day stuffing ourselves with chips, guac, cookies, and a failed attempt at frozen yogurt, so we really weren't all that hungry. Thus something simple and quick to hold us over before the fireworks.
Sadly, I do not have any more pictures for you. So imagine if you will, a skillet on medium heat. Take your flour tortilla and place it in the skillet to warm it on the side that will be holding your fillings. Remove said tortilla and lightly butter your skillet. Place the tortilla back in the pan, this time facing the other way so the outside is cooking nicely in the butter. Having a pre warmed interior means faster cook time, which results in a less burnt exterior.
You can add your cheese almost immediately and watch it melt. I then added shrimp which I poached in chicken broth, but you can use any pre cooked shrimp you have. After only a minute or two the cheese should be mostly melted. You can put a lid over the skillet for 30 seconds or so. Then fold the tortilla over, heat about another 30 seconds, slide onto a plate, and slice into thirds.
No microwaves or toaster ovens allowed.
The salsa is much more exciting. Get a fresh mango. Chop it into small cubes. Similarly chop some red onion and cilantro. Put it all togeter with some fresh lime juice and toss to coat. Proportion to your own tastes. I had about 1/3 cup red onion, 1 1/2 to 2 cups mango, 1/3 cup cilantro, and maybe a tbsp or 2 of lime juice.
Serve as a garnish with chips, dillas, or any white fish, especially if the fish is blackened or spicy because the mango and lime provide a nice contrast.
Sadly, I do not have any more pictures for you. So imagine if you will, a skillet on medium heat. Take your flour tortilla and place it in the skillet to warm it on the side that will be holding your fillings. Remove said tortilla and lightly butter your skillet. Place the tortilla back in the pan, this time facing the other way so the outside is cooking nicely in the butter. Having a pre warmed interior means faster cook time, which results in a less burnt exterior.
You can add your cheese almost immediately and watch it melt. I then added shrimp which I poached in chicken broth, but you can use any pre cooked shrimp you have. After only a minute or two the cheese should be mostly melted. You can put a lid over the skillet for 30 seconds or so. Then fold the tortilla over, heat about another 30 seconds, slide onto a plate, and slice into thirds.
No microwaves or toaster ovens allowed.
The salsa is much more exciting. Get a fresh mango. Chop it into small cubes. Similarly chop some red onion and cilantro. Put it all togeter with some fresh lime juice and toss to coat. Proportion to your own tastes. I had about 1/3 cup red onion, 1 1/2 to 2 cups mango, 1/3 cup cilantro, and maybe a tbsp or 2 of lime juice.
Serve as a garnish with chips, dillas, or any white fish, especially if the fish is blackened or spicy because the mango and lime provide a nice contrast.
Sunday, June 26, 2011
Swiss Chard, Mushroom, and Feta Fritata
I was in charge of bringing breakfast to our weekly Tuesday morning meeting at work a few weeks ago. Typically people pick up a box of bagels. If we're lucky they pick up breakfast pastries from somewhere more exotic. And on the very rare occasion we get a homemade version of a breakfast crumble. Not being one to settle for store bought breakfast, and wanting to abandon the carb heavy trend that has been set, I decided to make something more suited to my tastes. I'm an eggs and bacon kind of girl, so a fritata seemed perfect. Though, I also made banana bread so people could have the familiar starch option to fall back on.
The fritata was the best way to serve eggs aside from bringing in a plug in skillet and making made to order omelets in the conference room. I baked it about 90% the night before, put it in the fridge, and finished it in the oven the next morning before work. This is ideal for parties or early mornings when you want as little to worry about the day of the meal.
I decided to prepare a vegetarian fritata, seeing as that would be safest. I figured feta cheese was less polarizing than goat, but the swiss chard would give it a fun kick slightly stronger than spinach.
| a pile of stalks compared to a still intact leaf of swiss chard |
My favorite part of preparing chard is removing the stalks. You basically grab a hold of the thick end with one hand, and with your other hand, lightly cup over the same end of the stalk and slide up. The leaves will be almost entirely removed. Since the stalk is so thick, you don't want to just cut off the bottom, you want to get rid of all of it. Be sure to rinse and dry your chard, and you can either tear or chop into large pieces.
Meanwhile, slice your onion and mushrooms. I used 1/2 a yellow onion and 12 oz mushrooms. Saute in butter to soften.
I would use bacon fat had I included meat in this dish, and if you have a stronger morning palate, feel free to throw in some garlic.
Once softened, throw in the chard to wilt it. Some people may add water to wilt their greens, I found this unnecessary and didn't want to have to drain too much of the chard after cooking.
Once wilted, there will be some residual liquid from the leaves. Typically people tell you to wilt greens alone, then wring them dry, but I wanted all the flavors to infuse together, so instead I strained the entire mixture to remove excess water/butter.
Meanwhile in a large bowl I whisked 12 eggs. I added some salt and pepper, the chard/mushroom/onion mixture, and finally about 6 oz feta cheese. I combined everything well, then poured into a greased glass baking dish and baked in a 325 degree oven for 50 minutes.
Make sure the eggs aren't overcooked, remove, cover, refrigerate, and the next morning reheat in the 325 degree oven for 10 minutes.
Subscribe to:
Posts (Atom)