Showing posts with label tomatoes. Show all posts

Saturday, October 27, 2012

Shrimp Ratatouille


This is my variation on a ratatouille.  I pretty much define ratatouille as a vegetable stew with a tomato sauce base.  Typically squash and eggplant are involved with other veggies, spices, and the tomato sauce.  For this variation I was lacking the eggplant but included shrimp and served it over rice with a dollop of hummus on top.

So the first step is to saute your base vegetables.  I used zucchini, onion, mushrooms, and garlic in a little olive oil until they were slightly browned and mostly softened (about 5-10 minutes).
Next I added the tomatoes.  I used canned diced tomatoes with the juice included.  Perhaps you would like to make your own sauce, or take a pre-made tomato sauce, but I find the caned variety do the trick when you add enough extra herbs/spices and the liquid cooks off.  
I added salt/pepper and thyme (and would have added oregano or marjoram had I had some) and allowed this mixture to stew for about 10 minutes before adding the shrimp and some frozen spinach.  
I let this stew for about 5 minutes until the shrimp were cooked completely.  You don't want to stew shrimp for too long because they'll end up getting tough and chewy, so add them right before you're ready to serve your dish.  I scooped this over some white basmati rice, but this is also typically a side dish in French cuisine, so without the shrimp this could go well with chicken, steak, or fish...just don't pair it with another stew because then you have too many competing sauces going on.  

Sunday, October 7, 2012

Stuffed Cabbage

I inherited some cabbage awhile back and not having used it before, I decided to follow some Russian influences and make some stuffed cabbage.  The key for this dish is to boil the cabbage first so the leaves are malleable as you go to stuff them.  Then what you stuff them with is entirely up to you.  I used chicken, rice, and veggies for mine.

So first up, cut the cabbage in half and add the halves to boiling water.  You will lose the integrity of some of the leaves for wrapping, so some wraps may involve 2 leaves instead of 1.  But do be sure you split the cabbage in half lengthwise (so the stalk gets cut in half, otherwise every leaf will be cut in half.
Meanwhile, prepare your filling.  I cooked brown rice according to package instructions, and sauteed some red onions, mushrooms, and garlic in a little olive oil.
Once softened I removed the veggies to the sauce pan containing the rice and sauteed my chicken which I had chopped into 1/2 inch cubes.
Once the chicken was fully cooked, I transferred it too to the rice and veggies and made sure everything was nicely mixed.  I also added diced fresh tomatoes, chopped scallions, salt, and pepper.  
By this point, the cabbage was fully boiled (at least 20 minutes, but longer depending on how cooked you like your cabbage).  Carefully remove the hot cabbage from the water and when cool enough to handle, separate the leaves into individual "bowls" for stuffing.  To each leaf I added a spoonful of my stuffing and topped with freshly grated cheese.
At this point, roll them like a burrito and the next step is at your discretion.  I placed them seam-side down back into the skillet to char a little bit, but also heat through.  You could also put them in a baking dish and put them in the oven for 10-20 minutes.  I added a little broth to get a little steaming action going on, but if you have a sauce prepared, such as a tomato sauce, creamy bechamel, or something else you prefer, you can cook the wraps in the sauce.

To serve, I plated my wraps and added a dollop of sour cream (which is often served with stuffed cabbage at Russian restaurants, only it is a slightly different consistency than the sour cream available in US supermarkets).

Sunday, June 17, 2012

Shrimp Sandwich

I'm a fan of a good sandwich, and when you're lucky enough to get fresh ingredients and good bread, you're pretty much guaranteed a tasty sandwich.  This particular lunchtime delight features shrimp, avocado, bacon, tomato, goat cheese, mayo, and a little parmesan for good measure on Tuscan Pane bread. 
Toast your bread.  I toasted one slice with some parmesan cheese to melt into it.  Spread your condiments of choice on each side.  Slice your toppings and layer away.  I did avocado on one side, since the avocado would stick well to the bread when it came time to flip.  Then the other side I started with the bacon and weighted it down with the tomato slices.  Next I topped with the shrimp that I quickly poached to cook through beforehand.  I added the goat cheese for the final touch, combined the two sides, and sliced on a bias down the middle. 

Saturday, June 9, 2012

Burritos

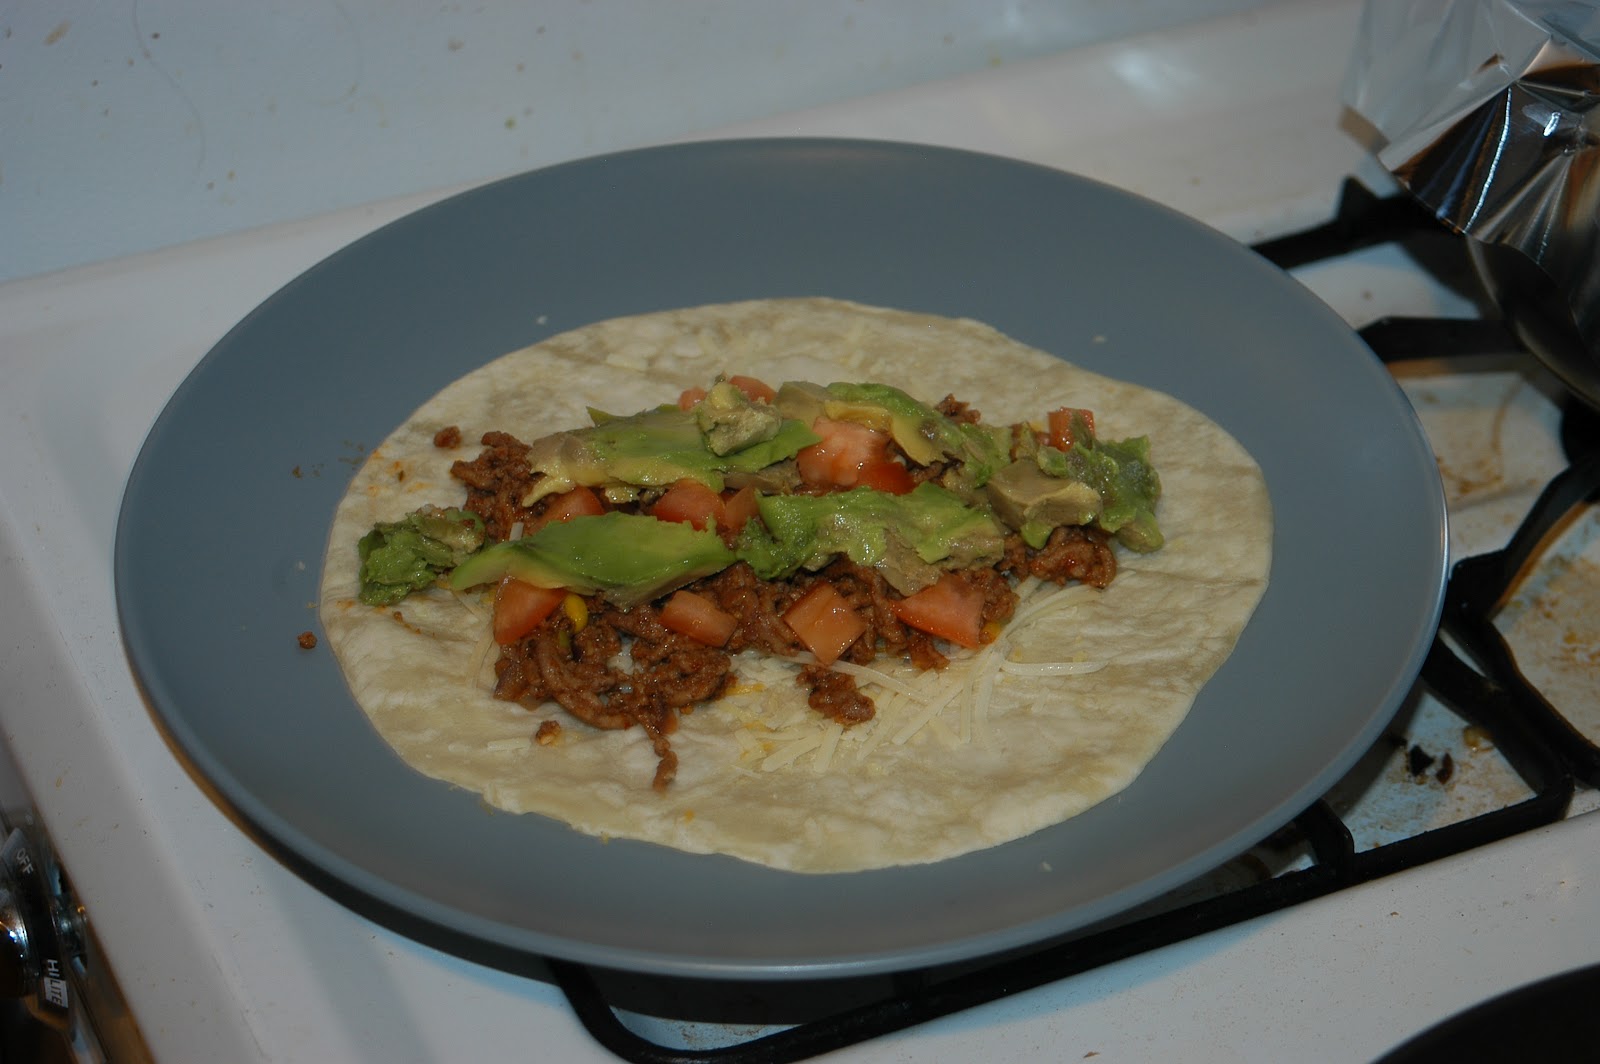
What's better than a meal you can eat with your hands, and is teeming with flavors and ingredients?  For when you don't want to be constrained by forks, burritos are a sure bet.  If you really want to do these right, I recommend getting large, thin four tortillas that are easily foldable.  I did not have those.  All you need to do next is choose your fillings and go to town.  I went with ground beef.
For this meal I began by sauteing the ground beef with some red onions and corn.  Once fully cooked I added the taco seasoning.
If you don't mind the extra fat contact, skip the part where the taco seasonings tell you to drain the fat and add water to the beef.  It tastes way juicier if you use the meat fat.  But if you don't want a complete calorie bomb for dinner, go ahead and ditch the fatty juices.

Once your meat is cooked, assembly is all that is left.  To prepare the tortillas, put them in the oven on low (200 degrees or so) to warm and soften them.  You can do this while the meat is cooking.  Then grab a plate and throw on your toppings.
Add the cheese to the warm tortilla so it will slightly melt and then be melted again by the heat of the beef.
If adding beans or rice, add them next before the meat.  I was lacking beans and I also forgot about the rice until the end so it was added a little out of order.
Cold ingredients come next.  Starting with the tomatoes.  And followed by the fresh avocado.
You can also do pico de gallo and guacamole in lieu of tomatoes and avocado, but at this stage add whatever veggies you want.  Lettuce works too.  
 Here's the rice I forgot to add earlier.  
The final touch is anything saucy.  I added sour cream and some salsa verde.  Then all that is left is to fold and wrap.  Fold the two sides in so they touch the toppings.  Grab the back flap and pull it over and around the innards, pushing the fillings inside as much as possible.  Continue to roll until your wrap is complete.  As you can see in the first image, my burritos were a tad overstuffed for these tortillas, so I had to keep one end open.  As long as you have one burrito butt to avoid food getting all over your hands you should be good. 

Monday, May 28, 2012

Potatoes, Shrimp, and Veggies over Rice and Lettuce

This was an interesting dinner I made about a month ago.  For some reason I was craving potatoes (well, aren't I always?), but also kind of wanted something fresh and salad-like.  So I figured I'd assemble pretty much everything fresh in my fridge on top of lettuce, but added some rice for texture and substance.  It was pretty good.

Ingredients: Romaine lettuce, tomato, cucumber, potatoes, basmati rice, shrimp, red onion, garlic, tarragon, cumin, coriander, salt/pepper, yogurt sauce to garnish

Start by peeling and chopping your potatoes.  I chopped into ~1 inch cubes, but do whatever you prefer.  Then, just as if I was preparing breakfast potatoes I cooked them in the skillet with a little bit of olive oil and added the tarragon, salt/pepper, cumin, and coriander.  Let them cook for about 20 minutes to cook through, and if you want you can periodically add a little broth that will be absorbed and soften the insides. 
Once primarily cooked, I added the red onion, a little garlic, and the shrimp to the pan.  Saute until the shrimp are pink and the onion softened.  I opted to chop my shrimp for the sake of having more shrimp scattered throughout in smaller bites.  It makes the shrimp go further.
Once cooked through you can assemble your meal.  I layered lettuce on the plate first, covered with the rice (it was leftover from a previous dinner so I just reheated it), piled the potatoes/shrimp on next, topped with fresh cucumber and tomato slices, and finally drizzled the sauce over.

The sauce was also leftover from a previous meal (see: Salmon w/ a Zucchini Yogurt Sauce).  It's basically a combination of 1:1 yogurt and mayo.  Then you throw in diced zucchini and chives, but really you can add whatever you like.  Or make your own yogurt sauce. 

So this dish is kind of like a salad, kind of like an mediterranean burrito bowl, but the combination of hot/cold, heavy/light makes for a tasty, hearty meal.

Monday, October 3, 2011

Spiced Shrimp with Avocado Corn Salsa

My friend hosted a dinner party last weekend and I volunteered to bring an appetizer.  The entree was turkey chili, so I wanted something that could compliment that and provide a little something different.  Now I'm embarrassed to say I did not take a picture of my finished product (mostly because it was in her kitchen surrounded by people I just met and I didn't feel the need to whip out my camera to document a bowl of shrimp).  So here's a stock photo from the internet, but if you look below you can see the blurry image of my bowl of salsa with shrimp dangling around the rim!
Look at that lovely bowl of appetizer holding it's own amidst a sea of lavish tableware.  Ok, enough about my lack of photography, here's how you make it.

Take your raw, peeled, deveined, butterflied jumbo shrimp and put them in your dry rub with a little olive oil and garlic.  I used cayenne pepper, paprika, ground coriander, dried oregano, cumin, pepper, diced garlic, extra-virgin olive oil.  Toss the shrimp to coat and place in the fridge until ready to grill (at least 30 minutes). 
Next prepare the salsa.  Dice your red onion and tomato first.  Then add your corn and chopped scallion.  I added the avocado, cilantro, and lime juice last, so as to avoid browning of the avocado.  Again, toss to coat and store in the fridge until ready to serve.  
I brought the uncooked shrimp and salsa to the dinner party and grilled the shrimp on the stove there.  You don't really need to oil the skillet since there's oil in the shrimp marinade.  Using tongs and a grill pan, cook about 2-3 minutes on each side until the shrimp is cooked through.  Arrange shrimp surrounding the salsa.  Rather than scoop the salsa with the shrimp and eat with your fingers, I recommend a fork.  The spiciness of the shrimp coupled with the cool and citrusy salsa make for a perfect pairing, and also go nicely before a hearty turkey chili. 

Sunday, July 24, 2011

Black Bean, Corn, and Tomato Salad

This salad fix I seem to be on is getting a little out of hand (yes, 2 salads constitutes a fix).  This one was made for a picnic and was primarily consumed atop chips, like a salsa.  It's one of my go-to picnic dishes because it's quite simple.

Combine 1 can black beans, 2 diced fresh tomatoes, 1 cup corn kernals, 3/4 cup diced red onion, and 1/2 cup loosely packed chopped cilantro.  Now again, I never measure these recipes, so that's approximate.  Add more or less of the items you like. 

For the dressing I add a little cumin and coriander (probably about 1 to 2 tsp worth of each) and fresh lime and lemon juices.  Just enough to coat the salad but without leaving a puddle of juice in the bottom (probably 2 to 4 tbsp total citrus juice).  And that's it!  Toss and serve.

Pro tip - I do find that the juice from the can of beans and the freshly chopped tomatoes can accumulate in a less than desirable fashion.  To deal with that, I poured the beans and chopped tomatoes into a sieve while I cut the onions and cilantro.  I was amazed by how much liquid dripped into the sink, but I find that the extra five to ten minutes I allowed for drainage really improved the overall taste and texture of this salad later.

Wednesday, July 13, 2011

The Art of the Omelet

with a dollop of herbed goat cheese on top
Omelets are my go-to weekend brunch item.  Having people over? Made to order omelets.  It's kind of my thing.  So being a self-proclaimed omelet aficionado I have found there tend to be 2 schools of omeleteers - the insiders and the mix-ins.  I myself am a mix-in.  

The insiders prepare the eggs to doneness, add the fillings at the very end and fold over.  Perhaps this is what you traditionally envision an omelet to be.  I, however, have found the taste to be much more appealing when the flavors get a chance to infuse with the egg.  Ingredients that I want to have cooked, such as mushrooms, onions, meat, etc., cook in the pan and the eggs are added to the ingredients.  That way the mix-ins are combined with the egg, ensuring that each bite has a little something different.  I'll put cheese strictly in the middle, and certainly am not averse to throwing more mix-ins/toppings into the center of the omelet, but I like my eggs to also have some surprises lurking within.  You may think of this as more of a scramble, but since the omelet ends up folded over and the egg is a single entity, I call it an omelet.  

I digress.  A very important first step to any good omelet is the preparation of the eggs.  I typically make 2-egg omelets.  Crack your eggs into a small mixing bowl and add milk.  About 1-2 tbsps should do for 2 eggs.  I eyeball it.  Add some salt and pepper and stir.
You want to make sure you have a nice homogenous mixture of yolk, white, and milk, but don't go overbeating.  If you want to add any dried or fresh herbs to your eggs, this is the stage I like to add them as well.  

Next, cook whatever fillings you will be using in a nice omelet-sized skillet.  Nonstick is great for a nicer looking omelet.  My pan is old and not very omelet friendly, but it's the perfect size!  As should be expected by now, I typically start by cooking the bacon.  Once done, I remove to paper towels, but then I use the bacon grease to saute my veggies.  If you are averse to bacon, or perhaps want something feigning healthiness, use butter.  

Once your veggies are sauteed to your likeness, add your scrambled egg/milk mixture.  You'll get a nice even coating of the pan and hopefully there will be a nice distribution of your veggies.  
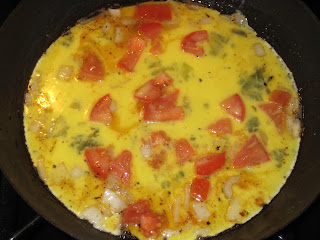
this omelet appears to contain onions and tomatoes
I used to think a good omelet was one whose integrity was never disturbed following the addition of the eggs to the pan.  It would often take awhile to cook through entirely, but I didn't want to disturb the beautiful flat egg pancake I had created.  I often covered the pan with a lid to help cook, but this was getting tedious.  I then learned that omelets actually taste exactly the same even if they're roughed up a little around the edges.  Using a nonstick, heatproof spatula, it's ok to push the cooked egg at the edges into the center and allow the still uncooked egg to ooze into this previously occupied space.  Sure you get a lumpy omelet in some places, but your egg cooks evenly and quickly.  

this omelet has onions, mushrooms, bacon, and cheese
Once the omelet is about 90% done, add your center toppings.  For me this will include the bacon and most definitely the cheese.  I can't have an omelet without cheese.  Scallions or chives are good at this point.  Avocados and tomatoes are also crowd favorites.

Finally, it's time to slide the omelet out of the skillet and fold it over on the plate.  You can fold it in the skillet if you'd like, but i've always been one to slide it off the pan half way and with a flip of the wrist let the top half fold over.  The lower your heat, slicker your pan, and shorter your cooking time, the less brown the finished outside of the omelet is.  And worst case scenario, if you mess up an omelet, you have a delicious scramble, still a meal that will certainly impress your guests when they've just woken up. 

Thursday, March 31, 2011

Enchiladas

This was my first foray into enchilada making, and I wanted to make everything from scratch, including the enchilada sauce. I never really knew what went into the sauce, but now I'm pretty much an expert.  And yes, they were delicious so I will make these many more times in the future.

The roommate and I made these the other night at midnight.  Perhaps we are insane, but midnight enchiladas are something everyone should try at least once.  And they reheat well too, making for good lunch the next day. 

For the sauce, I basically followed this recipe.  I heated oil in a saucepan, added the flour, then added the chili powder.  I didn't have any chicken stock or broth, so I ended up just using water.  And instead of having ten ounces of tomato paste, I only had six.  But I did have oregano and cumin!  So this is what it looked like:
While the sauce simmered and thickened, it was time to prep the filling.  First we sauteed 1 tbsp garlic with 1 chopped shallot in a little olive oil.  Once nicely softened and lightly browned I added the corn.  
After about a minute to heat through I added a can of diced tomatoes.  I then washed, peeled, and sliced the raw shrimp into halves and added the raw shrimp to the skillet.  After about five minutes the shrimp were pink and the filling was ready.


Now I apologize for the lack of pictures at this point.  It was midnight. I forgot about my camera while my hands were coated in enchilada sauce, but just pretend you can see what I did next.  First coat the bottom of your baking dish with some of the enchilada sauce.


Microwave the tortillas for half a minute to a minute to soften them and prepare them to be rolled.  We in total used five flour tortillas.  Coat the tortillas on both sides with a thin layer of enchilada sauce.  We did this on a plate so as not to make too much of a mess elsewhere.  We then sprinkled fresh monterey jack cheese over the inside of the tortilla.  Next, scoop about 1/2 cup of the filling into the center of a tortilla.  Roll/fold the tortilla to encase the stuffing, and place into the baking dish, seam side down.  Repeat for the rest of your tortillas.  Once your baking dish is full, cover the enchiladas with the remaining enchilada sauce.

Sprinkle shredded cheddar cheese generously on top and bake in a preheated 350 degree oven for 15 minutes.  
A peak inside the enchiladas after coming out of the oven
Sprinkle freshly chopped scallions and cilantro on top of the enchiladas once out of the oven.  When serving, add a dollop of sour cream, or perhaps some guacamole/avocado and enjoy your midnight fiesta!

Wednesday, November 10, 2010

Ground Beef Nachos

Dear blogosphere,

I apologize for my lack of dining/cooking at home.  This past week has been full of restaurants and microwave dinners.  I will make it up to you with fabulous home-cooked amazingness.  But that won't be tonight.

Sincerely,
LND Rookie Week

I was tired, but I told myself I had to make something that utilized the stove and at least one vegetable.  So I went for Mexican.  Nachos.  Simple.  You probably don't even need me to tell you how to make these.  Well, I will anyway, because then I can tell you all about the key ingredient: taco seasoning.  Browning ground beef is half the battle, but the taco seasoning takes it across the finish line (yes, I am mixing my metaphors).

Taco seasoning comes in packets near the rice/pasta/soup section.  The package says to brown the beef, drain the fat, add the package, then add a cup of water.  I leave a little fat and add about 1/2 cup of water.  Then I'll add more water if it's too dry.  Last night's taco beef then saw the addition of corn, tomatoes, and fresh cilantro (the first pruning of my new herb garden!).  Spoon the beef mixture over chips, add some shredded cheese, and a dollop of guacamole (sour cream if you're so inclined).  Straight from the cafeteria to your kitchen! (It's not one of my prouder home-cooking moments.)

Tuesday, October 19, 2010

Irish Nachos

Once, at an Irish pub, some friends and I saw Irish Nachos on the menu, basically potato skins in lieu of tortilla chips smothered in nacho glory.  As you might assume, they were delicious.  So in honor of the Giants game on Saturday, I decided to make my own version.

Ironically, my least favorite part of potato skins, is the actual skin.  So i decided to just peel my potatoes and slice them.  I lined them in a butter-coated pan, drizzled a tiny bit of olive oil, salt and pepper, and put them in a 350 degree oven while I prepped the rest of the ingredients.
potatoes after about 20 min in the oven
Next I chopped a tomato (organic, courtesy of the roommate's CSA), and a little bit of onion.  I sprinkled the onion on the potatoes and put them back in the oven to cook together longer.  Meanwhile I defrosted and chopped some chicken.  I threw it in a skillet w/ a little oil and spices (paprika, chili powder, oregano) and cooked it through.  Out of the oven again I now sprinkled the tomatoes, chicken, and a can of black beans atop the potatoes and onions and baked for about another 10 minutes.
potatoes, onions, tomatoes, chicken
Finally I took the nachos out one last time, grated some white cheddar and snipped some chives for the top (I was out of scallions).  Back in the oven for another 5 minutes to melt the cheese and it was Irish Nacho game time.  I served them with a hefty dollop of sour cream (sadly i had no avocados or guac in the fridge).  Even the vegetarian roommate pushed aside the chicken and found this dish delicious.  Let's hear it for a little south of the border and overseas fusion.

Tuesday, September 21, 2010

Homemade Pizza

Last week the roomslice was craving pizza and while we were debating which Mission pizzeria would provide the shortest wait for a Friday night dinner, we came to the conclusion that we should just make our own.  I've made the dough from scratch before, but this time we opted for the Trader Joe's uncooked packaged variety.
mmm dough. sitting for twenty minutes.


We portioned the dough into quarters to make two pizzas each.  One for dinner and one for lunch at work this week.  Now this is where the fun part starts because you can basically just throw on whatever you've got in the fridge.  I opted to first knead some chopped garlic in my dough for a kick of flavor.  Roommate went for a tomato sauce and I used a hummus guacamole for my base.  If I had had any, I likely would've opted for pesto instead, but we made do with what we had.
Roommate's more traditional pizza on the left.  My noncomformist pizza on the right. 
Toppings: I decided on shrimp, bacon, mushrooms, red onions, tomatoes, feta cheese, cheddar cheese, parmesan cheese.  I was debating adding a fried egg on top at the end, but decided there was already enough going on on my pie.  Tip: I cooked the bacon and the shrimp about three-quarters done before putting them on the pizza so that they wouldn't be raw going into the oven, but wouldn't become overcooked.  This was good because it meant I didn't end up with a pizza dripping with bacon grease, (though we all know I probably wouldn't have minded).

We cooked the pizzas on one of those no-stick cookie mats which still produced a good crust, but no sticking.  Perfect.  About ten minutes at 450 degrees and we were enjoying our home-made pies without the wait or the bill that comes with a restaurant. 

Thursday, September 16, 2010

Tomato and Feta Sandwich

This is what happens when you spend a couple weekends out of town and are going out of town again soon so you don't want to go grocery shopping.  You end up needing to finish the last of the bread, the feta cheese that's been around for far too long (no mold i promise!), and tomatoes are the only thing in your produce drawer.  Wait, I'm the only one this happens to?  So we got a little creative with last night's dinner.  Open faced tomato and cheese sandwich!

Slice the tomatoes, coat with salt, pepper, and dried basil.  Coat a heated saute pan with extra virgin olive oil and balsamic vinegar.  Add the tomato slices.  Cook about a minute on one side.  Flip over.  Put the feta cheese on top to heat while you cook for another minute.  Transfer tomatoes to a piece of toast and drizzle remaining balsamic/oil pan drippings over tomatoes/toast.  And there you have it.  A pretty lame dinner.

Monday, August 30, 2010

Tortilla Soup

I apologize for the less than glamorous "dishware", but sometimes it's more important not to dirty extra dishes.
Ingredients: Olive oil, Scallions, garlic, tomatoes, cilantro, oregano, chicken broth, corn, chicken
Garnishes: tortilla strips, cheese, avocado, fresh cilantro

This is my favorite recipe for tortilla soup.  I made enough soup for dinner and two lunches at work for this week, so the ingredient portions reflect that.  First, chop 6-12 small scallions and saute with 4 - 5 tbsp chopped garlic in a little olive oil.  Once tender, add 2 chopped tomatoes.  Add chicken broth (5-6 cups) and about a cup of chopped cilantro.  Bring to a boil, then reduce to a simmer for about 15 min. Add corn and chicken (i sauteed the chicken in oil and finished by poaching in broth before adding to the soup) and serve once heated through.  Garnish with freshly made tortilla strips (tortilla + olive oil in a hot pan), fresh cilantro, avocado, and grated cheese that will melt over the heat of the soup.  Perfect for leftovers when you add fresh garnishes each time.