Thursday, September 16, 2010

Tomato and Feta Sandwich

This is what happens when you spend a couple weekends out of town and are going out of town again soon so you don't want to go grocery shopping.  You end up needing to finish the last of the bread, the feta cheese that's been around for far too long (no mold i promise!), and tomatoes are the only thing in your produce drawer.  Wait, I'm the only one this happens to?  So we got a little creative with last night's dinner.  Open faced tomato and cheese sandwich!

Slice the tomatoes, coat with salt, pepper, and dried basil.  Coat a heated saute pan with extra virgin olive oil and balsamic vinegar.  Add the tomato slices.  Cook about a minute on one side.  Flip over.  Put the feta cheese on top to heat while you cook for another minute.  Transfer tomatoes to a piece of toast and drizzle remaining balsamic/oil pan drippings over tomatoes/toast.  And there you have it.  A pretty lame dinner.

Friday, September 10, 2010

Salmon with a Zucchini Yogurt Sauce

Served with mashed potatoes and asparagus, both of which also taste good with the yogurt sauce
This has been a favorite recipe of mine for years, though I forget where we first discovered it.  I like it because it's pretty quick and easy with few ingredients but it tastes way more involved.

Ingredients for the sauce: plain yogurt, mayo, zucchini, chives
Ingredients for the fish: salmon fillets, poaching liquid (I usually like white wine and water with tarragon, but this time we used chicken broth and it still tasted great)

Poached fish results in way more tender and juicy fillets than most other methods of cooking.  However, it is still possible to overpoach a fish.  I like to put the salmon in a saute pan that covers about 3/4 - 4/5 of the salmon with the poaching liquid on medium to medium-high heat (you want it to be just under a boil).  Once it appears that most of the fish is cooked slightly, aside from a small portion of the top part (maybe about 5-7 minutes) flip the fillets over.  Cook for the same amount of time on the other side and you're done.

For the sauce, mix equal parts plain yogurt and mayonnaise (we did 8 ounces each and had lots of leftovers).  Then take one small zucchini and dice it and a small handful of chives and dice them.  Add as much of the zucchini and chives as you'd like to the yogurt/mayo (we went for a whole zucchini and maybe 1/4 cup of chives).

And that's it.  Plate the salmon, spoon some sauce over, and make sure to leave the bowl of sauce on the table with dinner, because your guests will definitely be going for more.  (Zucchini garnish optional)

Thursday, September 9, 2010

Feta Mashed Potatoes

Yes, an entire post dedicated to my favorite tuber in one of its best forms: the mashed potato.  Again, needing to use up some potatoes and the last of the cream I couldn't quite finish with the risotto, I opted for a dish that never fails me.  Really any potato will do.  I happened to be using small yellow potatoes.

Peel, slice, boil.  Make sure the potatoes are of comparable sizes so they'll cook evenly.  When a fork inserted in the potatoes reveals them to be soft and slightly falling apart, you're ready to drain.  Next comes the good part.  Over very low heat, add your mix-ins.  Start with your butter, then your milk or cream (I used cream last night...it makes for a richer potato) and some salt and pepper (unless you boiled the potatoes in salt water, then be careful not too add to much).  If you're going for cheesy or garlic potatoes, add those now too.  I have a ton of feta cheese in my fridge so that was last night's flavor.  
Now you're ready to start your mashing.  Start by adding less butter/cream than you would think you need so you can add more once you get going.  No one wants runny potatoes, but dry potatoes are easy to salvage.  Once mashed to a desired consistency, you can add other mix-ins.  Spinach, bacon, whatever strikes your fancy.   And there you have it.  I'm not above eating a heaping plate of mashed potatoes with bacon on top as my only dinner item....they're that good. 

Wednesday, September 8, 2010

Risotto

My apologies for the blogging hiatus, but the holiday weekend found me in a different state...Ohio.  But now that we're back to the daily grind, it's time to use up ingredients that will go bad if they're in my fridge any longer.  So in order to utilize the last of my heavy cream and scallions: risotto.

The key ingredient is the rice.  I always keep arborio rice on hand for impromptu risotto.  The next key ingredient is the broth.  If you have those two things, you're pretty much set for a basic risotto, but obviously more ingredients are preferable. 

Typically you begin by sauteing onions in butter and olive oil and when tender you add the rice to coat in the oil/butter.  I, lacking onions, opted for scallions.  Then once you add the rice comes the fun part, i.e. you can't really leave the kitchen for the next 22 minutes.  If you have an open bottle of white wine, throw in about a quarter of a cup before you switch to broth.  But if this impromptu risotto resulted in no white wine lying around your kitchen you can go straight to the broth, as I did last night.  You'll want to add the broth (I opted for chicken) in batches.  Initially covering the rice, keep the pot over medium heat, stir occasionally, and when the broth is mostly absorbed add more.  You'll keep adding broth for the next 20-25 minutes until the rice wont absorb any more.  (The box will tell you how many cups of rice/broth are needed, but I usually just eyeball it).  At this point I added the shrimp.  (I'm also a fan of salmon or mushroom risotto, but feel free to add any combination of sauteed veggies you like.)  For the finishing touches, add a little heavy whipping cream, and some parmesan cheese.  I also threw in some salt and pepper and basil.  You can obviously adjust the creaminess to your liking, and the more it sits, the more it will continue to thicken and absorb the moisture.

Ingredients: Arborio rice, chicken broth, heavy cream, parmesan cheese, shrimp, scallions, basil, salt and pepper

Tuesday, August 31, 2010

Sliders!

Bacon Teriyaki, Bernaise Balsamic, Bacon and Blue
I'm just a little bit excited about last night's dinner.  Craving a burger on the way home from work I realized, "I've got some ground beef in the freezer, I'll make my own!" and thus...sliders!  And here's the fun part about sliders, you can make a few with different flavors so you don't have to choose just one type of cheese, or one type of marinade for the beef (Yes, I do in fact marinade my beef).  So here's the lowdown:

For the burger patties: Ground beef (I used 80/20), diced mushrooms, diced garlic, marinade (add diced onions if you have any...I didn't)
My two marinades: Balsamic vinegar or Teriyaki/soy sauce/sesame oil/sesame seeds
Cheeses: Roquefort, Parmesan, Cheddar, Feta (not pictured)
Toppings: Bacon, Scallions
Sauces: Mayo, Bernaise
Bread: Tuscan Pane (from Trader Joe's) lightly toasted

I enjoy marinading my ground beef to add flavor in the burger when you bit into it.  I opted for two marinades last night: a balsamic and a teriyaki.  I also enjoy throwing diced mushrooms and/or onions in with my ground beef to cook within the burger itself.  Another dimension of added flavor and texture.
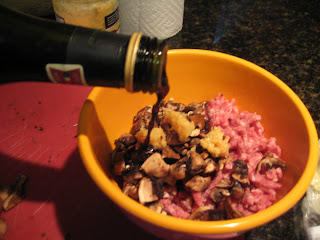
Ground beef, garlic, mushrooms, balsamic.  Don't be afraid to get your hands messy when you mix it all together.  
Once your beef is mixed to your liking, form small patties with your hands.  If you have trouble with the meat falling apart you can add some egg and milk, but your burgers will taste a bit like meatloaf, if you're cool with that.  Not wanting to use my grill pan, I again opted for the skillet cooked burgers.
It's important not to squish your burgers down as they cook, no matter what surface you're cooking them on, because that's how they lose all their good juices from the inside and you're left with a dry, unappealing burger.  You can squish once they're in the bun.  So cook these, turning over periodically until they're cooked through to your liking.  When almost done, you can add the cheese on top to melt before assembling your burgers.  I also like using bread instead of hamburger buns because I don't have to buy something special for these, and I actually love the taste/toasty texture.

So what were my final creations?  At the bottom of the first picture is your classic "bacon and blue" with the Roquefort cheese, bacon, scallion, and mayo.  This used the balsamic burger.  Going up clockwise we have a traditional bacon burger with cheddar cheese and mayo.  This utilized the teriyaki burger.  And my favorite of the night was the balsamic burger topped with parmesan, scallions, and bernaise sauce (bringing the steakhouse to the burger joint).  I had a ton of leftovers, so I must admit I nibbled later on a balsamic burger topped with feta, scallions, bacon, and bernaise sauce sans bread. 

Proof that you don't need a grill and don't need to settle on a single burger for dinner.

Monday, August 30, 2010

Tortilla Soup

I apologize for the less than glamorous "dishware", but sometimes it's more important not to dirty extra dishes.
Ingredients: Olive oil, Scallions, garlic, tomatoes, cilantro, oregano, chicken broth, corn, chicken
Garnishes: tortilla strips, cheese, avocado, fresh cilantro

This is my favorite recipe for tortilla soup.  I made enough soup for dinner and two lunches at work for this week, so the ingredient portions reflect that.  First, chop 6-12 small scallions and saute with 4 - 5 tbsp chopped garlic in a little olive oil.  Once tender, add 2 chopped tomatoes.  Add chicken broth (5-6 cups) and about a cup of chopped cilantro.  Bring to a boil, then reduce to a simmer for about 15 min. Add corn and chicken (i sauteed the chicken in oil and finished by poaching in broth before adding to the soup) and serve once heated through.  Garnish with freshly made tortilla strips (tortilla + olive oil in a hot pan), fresh cilantro, avocado, and grated cheese that will melt over the heat of the soup.  Perfect for leftovers when you add fresh garnishes each time.

LND: Restaurant Roundup

The weekend has come and gone, and this one was filled with many a restaurant fare.  Here I shall recap some of the dishes tasted, and some of the inspirations I've drawn from them.

We begin with Friday's dinner at Lalola, a tapas bar.  Tip: At any restaurant that offers a happy hour, eat dinner during then to take advantage of happy hour pricing not only on drinks, but on food.  Eating at 9pm is so 2009.  My inspiration from Lalola: patatas bravas. 
photo courtesy of Yelp
Typically cut in 2 inch cubes, boiled in brine, then fried, these potatoes are served with a tomato-based sauce and an alioli.  Wanting to repeat a similar tasting potato at home, I opt for peeling, then baking (either in the oven, or on the microwave's potato setting), then chopping and frying in oil for about 30 sec- 1 min.  Deliciously cooked potatoes on the inside with a fried crisp outside.  Trust me, it's delicious.

Next we discuss Saturday brunch at Tikka Benedict, a new pop-up brunch place in SOMA.  Still working out the kinks here, my inspiration comes from the namesake brunch item.  The tikka benedict originated when the restaurant's owner wanted to make eggs benedict but realized she was lacking hollandaise sauce and instead put leftover chicken tikka masala over her egg and english muffin.
photo courtesy of Yelp (definitely not how it looked on my plate)
While for now I would suggest skipping brunch here until they become more comfortable with poaching eggs in a timely manner, I would highly recommend making this at home.  Why did I never think of combining two of my favorite things (indian food and eggs benedict)?  Good for any meal of the day.

Recreating restaurant fare at home = delicious, budget conscious, and impressive at dinner parties.

Saturday, August 28, 2010

Skewers and Quinoa

My food discovery of the summer has been quinoa (keen-wah).  I decided to finally brave the world of cooking it for myself and have pretty much used it as a rice replacement.  I realize I prefer the red variety to the white variety, but accidentally purchased a box of white and last night finally finished it.

For last night's dinner, Safeway had a sale on marinated skewers so i figured, why not.  In my humble San Francisco apartment I do not own a barbecue.  I have a grill pan for the stove that works wonders, but is a huge hassle to clean.  So instead I opted for an initial pan-sear followed by 15-20 minutes in a 425 degree oven to achieve the perfect medium rare.  Using the leftover marinade, I sauteed some mushrooms, garlic, and scallions and threw in some cilantro for a kick.  Once the quinoa had been cooked according to the package directions, I tossed in my mushroom marinade saute to give flavor to my new favorite chenopod.  Fun fact: quinoa is not actually considered a grain because it does not actually come from the grass family.  And there you have it, a gussied up store-assembled meal.

Thursday, August 26, 2010

LND: Lunchbox Edition

The art of the homemade deli sandwich.  The bread is truly the key ingredient.  I'm a fan of dutch crunch myself, but since I buy sliced loaves rather than rolls for typical home consumption, I opt for a sourdough or similar option with a nice crust and firmer interior.  The bread du yesterday was a Tuscan Pane found at Trader Joe's.  Big fan.

The second most important part is the meat.  Not only the quality of the deli slices you've procured, but the placement in the sandwich.  Far too often I've ordered a deli sandwich and the slices of meat are all stuck together one on top of the other.  Ok, sure it may be the same meat, but I swear it tastes better when the deli slices are folded over themselves (almost like loosely rolled bundles) creating pockets of air between meat slices.  Trust me, it makes a world of difference.  

Next order of business: sauces/condiments.  For yesterday's sandwich I used mayonnaise on one slice of bread and a homemade feta/onion/mint sauce on the other slice of bread (ok, maybe a little bit off-putting for some, but I'm trying to use up my leftovers here).

Finally, you may begin assembly.  I start by partially toasting the bread, coating with the mayo/yogurt sauce, then piling.  Roast beef, bacon, and gruyere cheese go on one side. Lettuce on the other.  If i had had more ingredients in my pantry i could've gone to town: avocado, tomatoes, red onions, so on and so-forth, but i had to suffice with a meat-hearty meal.  I put the portion with the cheese in the toaster oven, to melt the cheese atop the bacon and beef.
Assembled, sliced, wrapped and ready for lunch.  When I'm ready to eat, I put it in the toaster oven at work to remelt the cheese and warm the meats just a little bit.  Fresh deli taste from my home kitchen.

Wednesday, August 25, 2010

Pasta with Bacon in a Feta Cream Sauce

We have a lot of feta cheese leftover from a dinner party last weekend, so I decided to try for a feta cream sauce for my pasta and this is what I came up with.  I adore cream sauces for pasta and the roux (flour + butter, or in this case bacon grease) is what ensured proper thickening of the sauce while the cheeses took care of the flavor.  

Ingredients from my fridge: Bacon, Garlic, Scallions, Mushrooms, Cream, Milk, Feta Cheese, Gruyere Cheese (substitute any ingredient with your fav veggies, meats, or cheeses instead)
Ingredients from my pantry: Farfale pasta, All purpose flour, pepper

Cook 3 slices of chopped bacon with a little garlic, mushrooms, and chopped scallions until cooked through.  Moving the bacon et al. to the side of the saute pan I added flour to the bacon grease to create a roux (about 2 tbsp worth of flour).  Then I added cream and milk to the mixture (about 1-1.5 cups total volume between the two) and stirred constantly as it thickened.  Lowering the heat I added the feta (about 3/4 cup worth) and mixed it in completely.  I also topped off with some freshly grated gruyere.  Add the freshly cooked pasta, some cracked pepper, and voila! Last Night's Dinner!