This dish was an attempt to recreate Middle Eastern inspired flavors in my kitchen that pretty much lacks typical spices/flavors/ingredients for that type of cuisine. But really if you just throw some hummus on top, that counts, right? I kid, I kid. But it certainly doesn't hurt.
The inspiration for this meal was to use the ground beef in my freezer. Add some rice, veggies, and the right spicing, and you've got yourself a meal!
Ingredients: ground beef (1 lb), 1 large zucchini, 1/4 white onion chopped, 1/2 lb mushrooms chopped, 1 can tomato paste, basmati rice, cumin, coriander, salt/pepper, toast/hummus/asiago cheese garnish
Begin by browning your beef. While cooking, prepare the zucchini. I cut the zucchini in half, halved it lengthwise again, and used a melon baller to scoop out the insides. Save the insides for the stew and the outer portions for the presentation.
As the beef is browning, add the chopped mushrooms and onions to cook in the heat and fat from the meat.
Once the meat is browned and the veggies are tender, add the zucchini innards (they'll take less time to cook than the onions/mushrooms). Cook another minute or two then add the can of tomato paste and your spices. Add spices to your desired tastes. And if you're lacking tomato paste, I'm sure you could use tomato sauce or fresh tomatoes instead. This just gives a stronger flavor. Once everything is mixed, I put the zucchini boats on top of the beef stew to cook them a little too.
I put a lid over the skillet and let everything steam for about 15 minutes. The flavors melded and the zucchini softened. To begin arranging the meal I started with some toasted sourdough bread. You could use pita, lavash, whatever you have. The bread was just a means to sop up extra stewy goodness. I put two zucchini boats on the plate and filled them with the cooked basmati rice.
I then covered the zucchini + rice mixture with the beef. I garnished with some hummus and freshly grated asiago cheese. A bizarre combination, yes. Perhaps we should call this a fusion dish. Anyway, garnish with whatever you'd like...fresh herbs, cheese, yogurt sauce, or nothing at all.
So you could just as easily serve this without the zucchini boats and just have larger chunks of zucchini cooked in with the beef. Serve it all over rice. Or throw together some pita sandwiches with some beef stew, rice, hummus, fresh lettuce and cucumber? Feel free to go to town with this one.
Chronicling my daily meals to showcase recipes, techniques, and restaurant fares. This is a blog to explore my love of all things edible and the processes behind them.
Saturday, April 14, 2012
Saturday, March 10, 2012
Halal Style Chicken and Rice
As a new New Yorker, I was unaware of the phenomenon that was the halal cart on practically every street corner in Manhattan until moving here a few months ago. So tonight's dinner is inspired by the chicken and rice you can buy off the street for $5 a pop, 24/7, with that oh-so-divine yet oh-so-mysterious "white sauce".
To construct my "knockoff chicken and rice" I created a lettuce base, topped with saffron infused rice mixed with cilantro, and finished with my chicken and veggies. But let's not forget the white sauce garnish. We had "dined" at one of the halal carts a few nights earlier, so we had leftover white sauce in a to-go container perfect for adding to our own meals throughout the week.
For this version I used romaine lettuce. (Here's an unnecessary picture of the pre-assembled lettuce on the plate.)
I prepared the yellow saffron rice according to package directions but added in about 1/4 cup chopped fresh cilantro toward the end of the cooking.
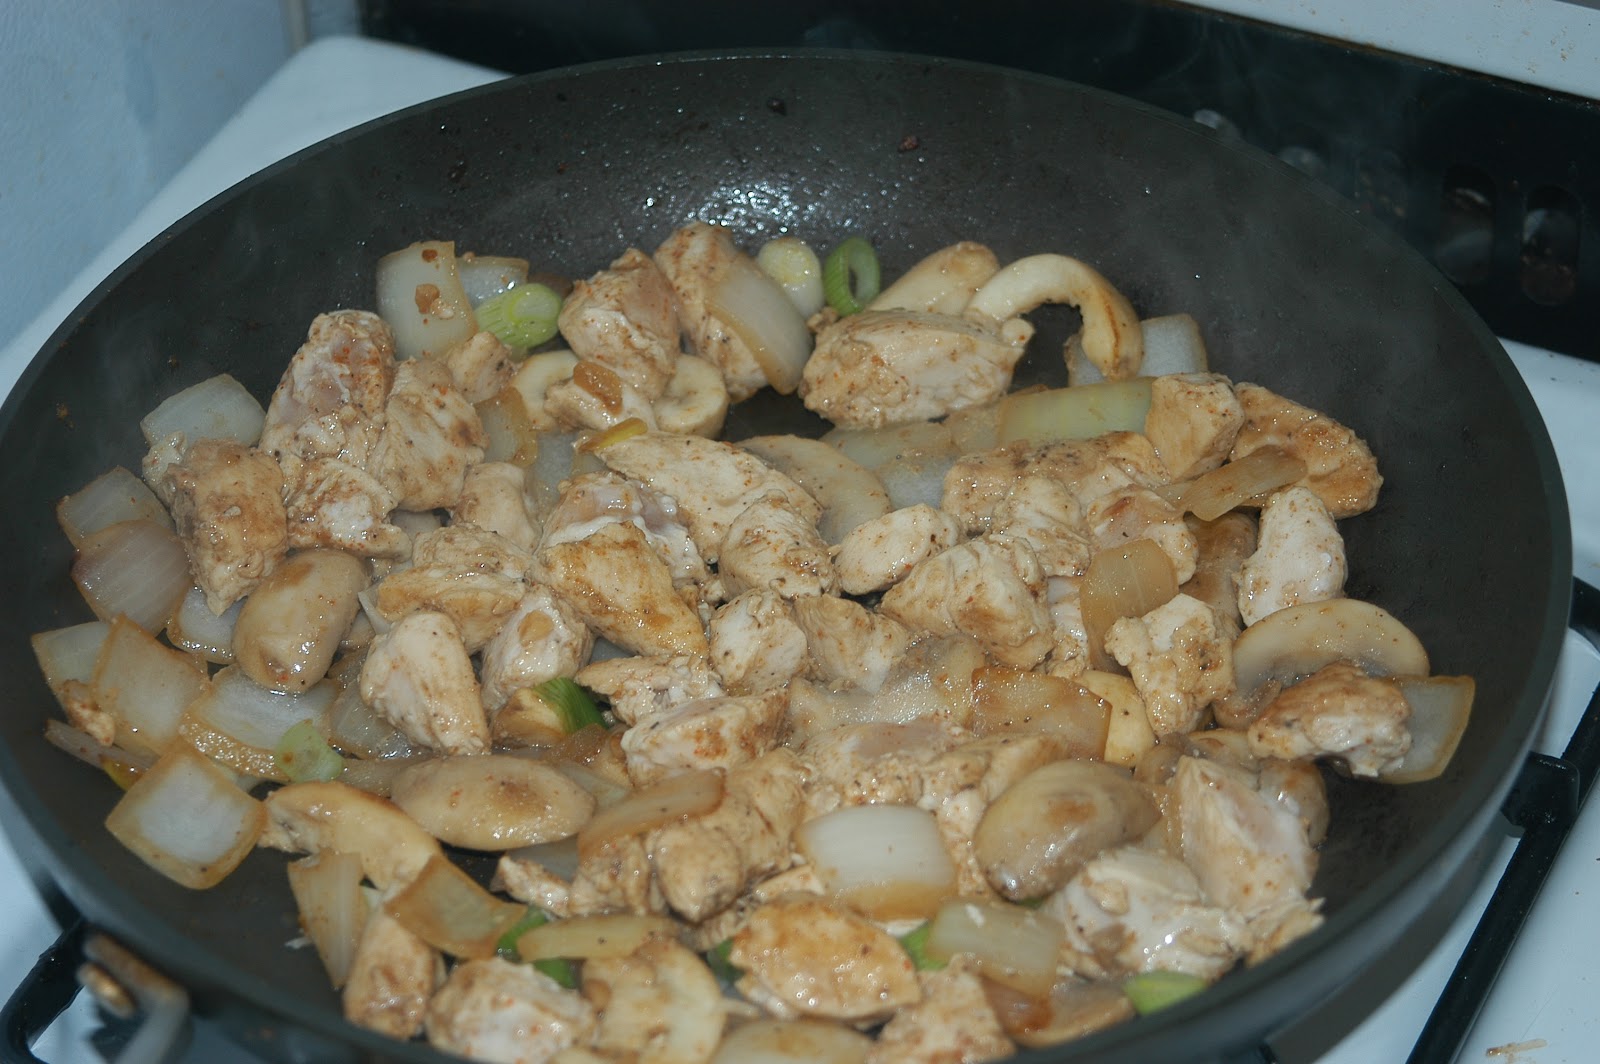
For the chicken, I chopped some yellow onion, mushrooms, scallions, garlic, and chicken breasts. Add a little olive oil to a skillet, saute the onion, garlic, and mushrooms until softened. Throw in your chicken. Now at this point I added my spices: cumin, coriander, cayenne pepper, and ground black pepper.
I went for cooking over a dry heat with dry spices to mimic the fresh-off-the grill aspect of the halal carts. I threw the scallions in toward the end to cook a little. But ultimately, the chicken and veggies were quite darkened and had a nice kick to them.
I scooped my rice on top of the lovely bed of lettuce showcased above. Then came the chicken/veggies. And finally what street food meal is complete with the sauce? A little googling yieldss mixed theories as to the contents of this sauce. Some say mayo/vinegar. Some say cucumber/yogurt. Our version of the sauce had many black specks in it (and no cucumber to be found), and the taste was reminiscent of ranch dressing. So use whatever sauces/dressings you like. The lettuce lets you pretend you're having a salad, while the rice reminds you that you're having a heartier meal.
To construct my "knockoff chicken and rice" I created a lettuce base, topped with saffron infused rice mixed with cilantro, and finished with my chicken and veggies. But let's not forget the white sauce garnish. We had "dined" at one of the halal carts a few nights earlier, so we had leftover white sauce in a to-go container perfect for adding to our own meals throughout the week.
For this version I used romaine lettuce. (Here's an unnecessary picture of the pre-assembled lettuce on the plate.)
I prepared the yellow saffron rice according to package directions but added in about 1/4 cup chopped fresh cilantro toward the end of the cooking.
For the chicken, I chopped some yellow onion, mushrooms, scallions, garlic, and chicken breasts. Add a little olive oil to a skillet, saute the onion, garlic, and mushrooms until softened. Throw in your chicken. Now at this point I added my spices: cumin, coriander, cayenne pepper, and ground black pepper.
I went for cooking over a dry heat with dry spices to mimic the fresh-off-the grill aspect of the halal carts. I threw the scallions in toward the end to cook a little. But ultimately, the chicken and veggies were quite darkened and had a nice kick to them.
I scooped my rice on top of the lovely bed of lettuce showcased above. Then came the chicken/veggies. And finally what street food meal is complete with the sauce? A little googling yieldss mixed theories as to the contents of this sauce. Some say mayo/vinegar. Some say cucumber/yogurt. Our version of the sauce had many black specks in it (and no cucumber to be found), and the taste was reminiscent of ranch dressing. So use whatever sauces/dressings you like. The lettuce lets you pretend you're having a salad, while the rice reminds you that you're having a heartier meal.
Tuesday, February 28, 2012
Pesto Chicken Sandwich
Today I have yet another delicious lunchtime sandwich option for you all. I was craving some chicken pesto the other night, but decided it was more of an afternoon meal, so the next day I went to town. Pretty much all you need for this is chicken and pesto sauce and the rest of the accompaniments are up to you. I would've liked some avocado or maybe some lettuce or fresh tomato, but alas you use what you have, and here is what I made given the ingredients in my fridge. Granted, it was still obviously a delicious and decadent sandwich.
1. Toast your bread. I went with sourdough.
2. Cook your bacon. I did this in a pan on the stove.
3. Cook your chicken. I used two chicken breast tenders which I first seared in the bacon grease, but then ultimately poached in a little broth/water combo. This was to make sure it would cook through and remain moist. When it was pretty much done, most of the liquid had evaporated so I spread a thick slab of pesto on top of the chicken, put the lid on the saucepan and cooked another 3-5 minutes.
4. Assemble.
On one slice of the bread I placed some red onion slices, covered with my bacon strips, and crumbled some herbed goat cheese on top. On the other slice of bread I spread a coat of mayonnaise, placed my two chicken slices on top, and shaved some fresh parmesan cheese onto the still hot chicken so it would melt.
Carefully flip over one of the sides of the sandwich. Press together lightly, slice on the bias, and enjoy this cheesy, pesto-ey, meaty deliciousness.
1. Toast your bread. I went with sourdough.
2. Cook your bacon. I did this in a pan on the stove.
3. Cook your chicken. I used two chicken breast tenders which I first seared in the bacon grease, but then ultimately poached in a little broth/water combo. This was to make sure it would cook through and remain moist. When it was pretty much done, most of the liquid had evaporated so I spread a thick slab of pesto on top of the chicken, put the lid on the saucepan and cooked another 3-5 minutes.
4. Assemble.
On one slice of the bread I placed some red onion slices, covered with my bacon strips, and crumbled some herbed goat cheese on top. On the other slice of bread I spread a coat of mayonnaise, placed my two chicken slices on top, and shaved some fresh parmesan cheese onto the still hot chicken so it would melt.
Carefully flip over one of the sides of the sandwich. Press together lightly, slice on the bias, and enjoy this cheesy, pesto-ey, meaty deliciousness.
Friday, February 24, 2012
Nutmeg Scones
Who doesn't like a good breakfast pastry? Scones are great because they're a flakier, slightly sweeter version of say toast or an english muffin, but not quite as deviant as, say, a bear claw or danish. I like to put out scones at brunches, and they're always a hit, sometimes prompting an intense scone vs. crumpet debate (crumpets are more porous and contain yeast, where scones instead utilize baking powder. scones also originated in Scotland while crumpets came from Wales).
My favorite scone recipe includes nutmeg and so the other morning I adapted the ingredients around what I had and the quantity of scones I was hoping to make.
Ingredients:
1 cup flour
1/8 cup sugar
1/2 + 1/4 tsp baking powder
1/8 tsp baking soda
1/4 tsp salt
1/4 tsp nutmeg
1/4 cup butter
1/4 cup sour cream
1 egg
I typically utilize a food processor to make scones, but all I currently have in my kitchen is a mini processor, hence the tiny proportions of ingredients. Feel free to multiply the above ingredients if you have a larger preparation vessel.
Step 1: combine the dry ingredients (the first six on the above list)
Step 2: Add the butter. Make sure your butter is still cold and chopped into a cubes (a must in most dough recipes). This is why the processor is ideal because the blade helps cut the butter into the dry ingredients, much more easily than if you attempted this by hand.
Step 3: Add the wet ingredients (egg and sour cream):
Once completely pulsed, you'll get a crumbly mixture. Pour it onto a floured surface and knead into a large ball of dough. Separate the dough in half and depending on the size of scones you want to make, cut them accordingly. I made 8 mini scones so I hand patted each half of the dough into a square and cut it in quarters along the diagonals.
Spray a baking sheet with cooking spray and place your scones on top. For added flavor, sprinkle some sugar and nutmeg atop the scones before baking. For even more added crunch, create an egg-white wash (just whisk egg whites and water) and rub/paint a little on top of the scones before adding the sugar/nutmeg. Then bake for 10-15 minutes in a 350 degree oven.
Serve warm when the flakiness can be most appreciated. Serve with devonshire cream or lemon curd like at a fancy tea establishment or simply butter or jams. Or you could use nothing at all, since they have enough flavor to stand out on their own.
My favorite scone recipe includes nutmeg and so the other morning I adapted the ingredients around what I had and the quantity of scones I was hoping to make.
Ingredients:
1 cup flour
1/8 cup sugar
1/2 + 1/4 tsp baking powder
1/8 tsp baking soda
1/4 tsp salt
1/4 tsp nutmeg
1/4 cup butter
1/4 cup sour cream
1 egg
I typically utilize a food processor to make scones, but all I currently have in my kitchen is a mini processor, hence the tiny proportions of ingredients. Feel free to multiply the above ingredients if you have a larger preparation vessel.
Step 1: combine the dry ingredients (the first six on the above list)
Step 2: Add the butter. Make sure your butter is still cold and chopped into a cubes (a must in most dough recipes). This is why the processor is ideal because the blade helps cut the butter into the dry ingredients, much more easily than if you attempted this by hand.
Step 3: Add the wet ingredients (egg and sour cream):
Once completely pulsed, you'll get a crumbly mixture. Pour it onto a floured surface and knead into a large ball of dough. Separate the dough in half and depending on the size of scones you want to make, cut them accordingly. I made 8 mini scones so I hand patted each half of the dough into a square and cut it in quarters along the diagonals.
Spray a baking sheet with cooking spray and place your scones on top. For added flavor, sprinkle some sugar and nutmeg atop the scones before baking. For even more added crunch, create an egg-white wash (just whisk egg whites and water) and rub/paint a little on top of the scones before adding the sugar/nutmeg. Then bake for 10-15 minutes in a 350 degree oven.
Serve warm when the flakiness can be most appreciated. Serve with devonshire cream or lemon curd like at a fancy tea establishment or simply butter or jams. Or you could use nothing at all, since they have enough flavor to stand out on their own.
| lemon curd! |
Sunday, February 12, 2012
Zucchini and Saffron Vichyssoise with Scallops
I've made this soup a few times now, and it's one of my favorite indulgences, for when you've got saffron threads you're just dying to use. A vichyssoise is a thick, starchy soup based on potatoes and cream typically served cold. But I'm not so much a fan of cold soups. So I serve this one hot, and it's definitely a winner. The original recipe comes from epicurious, so you can see what you need and in what quantities, but I'll show you the pictures and tell you my process.
Ingredients: zucchini, onion, potatoes, butter, garlic, saffron, chicken broth, bay leaf, thyme, heavy cream, lemon juice, salt and pepper, scallops, and bacon for garnish (not in the original recipe, but how could i resist?)
For this dish I peel the zucchini and the potatoes completely. I cut them both into small cubes as well as the onion. First saute the onion in the butter. Once softened add the potatoes, garlic, and saffron and cook for a minute.
Next add the broth and your spices (bay leaf, thyme) and cook over medium/medium-low heat until the potatoes are softened, about 15-20 minutes depending on your potatoes.
Add the zucchini last because it is already soft enough it shouldn't need to cook as long as the potatoes. After about 10 minutes it should be softened enough.
At this point, bust out your immersion blender (or the regular blender if you don't have the handheld variety), and puree the soup nicely. The recipe mentions pouring through a fine sieve, but I don't like losing some of the thick starchiness, so I skip that step, opting to leave every bit of the soup intact. At this point you can add the cream, lemon juice, and salt/pepper.
If you want cold soup let it cool, then put it in the fridge (don't put it directly into the fridge or you ruin the integrity of the flavors from the cold-shock). But if you want it served warm you can let it sit on low heat at this point, or leave the burner off until right before you're ready to serve it and turn the heat back up.
This soup is great on it's own, but if you need some meat with your dinner, the scallops are an excellent accompaniment. Get the large sea scallops and slice them horizontally into smaller discs. Since I'm a glutton for all things pork fat, I obviously decided a bacon garnish was necessary moreso than a zucchini garnish, so in a small skillet render some chopped bacon. Remove from heat and to the bacon grease in the pan you can add a little butter and then sear your scallops. Season with salt and pepper first, then add the scallop to the medium/medium-high heated skillet. You'll only need to cook for about a minute on each side. You want to cook the scallop through, but overcook it and you get a tough mess so err on the side of less time on the stove.
To serve, plate (bowl?) your soup. Add some scallop slices and sprinkle with bacon. The soup provides a nice thick pillow for the scallops and the flavors really do play well together.
Ingredients: zucchini, onion, potatoes, butter, garlic, saffron, chicken broth, bay leaf, thyme, heavy cream, lemon juice, salt and pepper, scallops, and bacon for garnish (not in the original recipe, but how could i resist?)
For this dish I peel the zucchini and the potatoes completely. I cut them both into small cubes as well as the onion. First saute the onion in the butter. Once softened add the potatoes, garlic, and saffron and cook for a minute.
Next add the broth and your spices (bay leaf, thyme) and cook over medium/medium-low heat until the potatoes are softened, about 15-20 minutes depending on your potatoes.
Add the zucchini last because it is already soft enough it shouldn't need to cook as long as the potatoes. After about 10 minutes it should be softened enough.
If you want cold soup let it cool, then put it in the fridge (don't put it directly into the fridge or you ruin the integrity of the flavors from the cold-shock). But if you want it served warm you can let it sit on low heat at this point, or leave the burner off until right before you're ready to serve it and turn the heat back up.
This soup is great on it's own, but if you need some meat with your dinner, the scallops are an excellent accompaniment. Get the large sea scallops and slice them horizontally into smaller discs. Since I'm a glutton for all things pork fat, I obviously decided a bacon garnish was necessary moreso than a zucchini garnish, so in a small skillet render some chopped bacon. Remove from heat and to the bacon grease in the pan you can add a little butter and then sear your scallops. Season with salt and pepper first, then add the scallop to the medium/medium-high heated skillet. You'll only need to cook for about a minute on each side. You want to cook the scallop through, but overcook it and you get a tough mess so err on the side of less time on the stove.
To serve, plate (bowl?) your soup. Add some scallop slices and sprinkle with bacon. The soup provides a nice thick pillow for the scallops and the flavors really do play well together.
Monday, January 16, 2012
Fish Tacos
Typically made with fried fish, this grilled fish variety makes for a lighter version of a delicious mexican inspired taco that always makes me think of San Diego. We had some tilapia in the freezer and what better way to utilize it than with some cilantro, lime juice, and avocado?
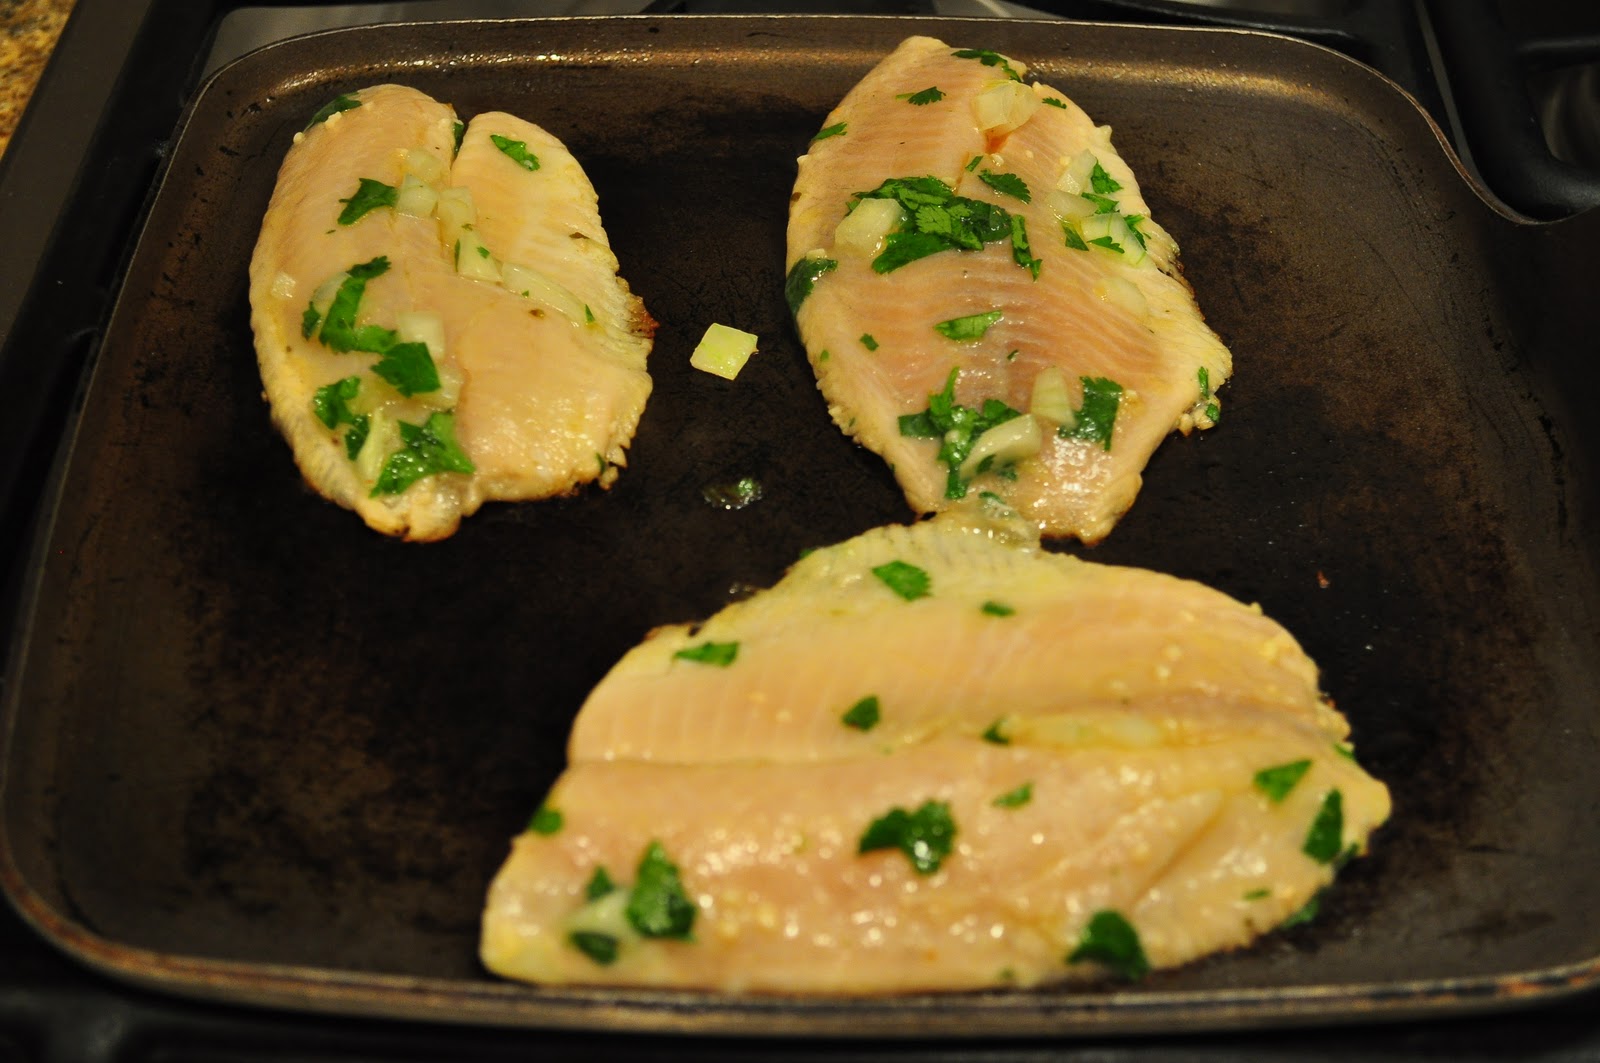
You can marinade your fish with whatever you like, but I opted for my standard ziploc bag filled with diced white onion, chopped cilantro, olive oil, lime juice, orange juice, garlic, oregano, salt, and pepper. Throw your fish in, put in the fridge and let it sit for 30 minutes to several hours.
Next, prepare your grill. If you aren't using a grill, go for a grill pan. If you are lacking a grill pan, a flat skillet works well too (what I used in this case). Add a little oil to the skillet and throw on your tortillas. We opted for small corn tortillas, since these are soft tacos, but if you want flour or crunchy taco shells, by all means, do your thing, but I highly endorse soft tortillas for this meal.
While these are grilling I made a lime mayonnaise with 1 cup mayo, 1 tsp milk, 3 tbsp lime juice, and a dash of the fresh cilantro. Remove your heated tortillas from the grill/skillet and coat with your desired amount of lime mayo.
Next, grill your fish on the same pan, with a little excess marinade still suck to the fish. I'm not really a fan of patting dry, because I don't want to lose the extra flavor.
Since tilapia is a very thin white fish, it will cook rather quickly. Turn after a couple minutes on one side, and once done, you can break it into smaller pieces to fill your tacos. I arranged the sliced lettuce on the bottom of the tortilla, topped with the fish, added some fresh avocado, drizzled with about a tbsp of the leftover marinade from the baggy, and topped with a little bit more of the lime mayo.
Simple, delicious finger food that makes for a good lunch or dinner.
You can marinade your fish with whatever you like, but I opted for my standard ziploc bag filled with diced white onion, chopped cilantro, olive oil, lime juice, orange juice, garlic, oregano, salt, and pepper. Throw your fish in, put in the fridge and let it sit for 30 minutes to several hours.
Next, prepare your grill. If you aren't using a grill, go for a grill pan. If you are lacking a grill pan, a flat skillet works well too (what I used in this case). Add a little oil to the skillet and throw on your tortillas. We opted for small corn tortillas, since these are soft tacos, but if you want flour or crunchy taco shells, by all means, do your thing, but I highly endorse soft tortillas for this meal.
While these are grilling I made a lime mayonnaise with 1 cup mayo, 1 tsp milk, 3 tbsp lime juice, and a dash of the fresh cilantro. Remove your heated tortillas from the grill/skillet and coat with your desired amount of lime mayo.
Next, grill your fish on the same pan, with a little excess marinade still suck to the fish. I'm not really a fan of patting dry, because I don't want to lose the extra flavor.
Since tilapia is a very thin white fish, it will cook rather quickly. Turn after a couple minutes on one side, and once done, you can break it into smaller pieces to fill your tacos. I arranged the sliced lettuce on the bottom of the tortilla, topped with the fish, added some fresh avocado, drizzled with about a tbsp of the leftover marinade from the baggy, and topped with a little bit more of the lime mayo.
Simple, delicious finger food that makes for a good lunch or dinner.
Sunday, January 15, 2012
Roasted Chestnut Soup
A very (belated) Happy New Year to you all, dear readers. I amassed a bit of a backlog of recipes from the holiday season, and with time permitting I can now bring you the pictures and instructions. This first winter soup was made following a recipe created by Chef Paul Virant from Vie in Chicago (I must admit I had never heard of him or the restaurant either, but then again I don't follow the Chicago restaurant scene at all).
Chestnuts are typically stocked at your local grocer seasonally. I once attempted to procure chestnuts in the summer, only to discover no market in San Francisco had them in stock. But come Thanksgiving and suddenly everyone is all about the chestnuts. Go figure. (not to be mistaken for water chestnuts, which are always easy to find). You typically can purchase chestnuts already shelled and in a jar or can soaked in water.
So here's the recipe:
3 tablespoons butter
1 stalk celery, chopped into one inch half moons
1 carrot, chopped into one inch half moons
1 onion, quartered and chopped into one inch half moons
2 tablespoon chopped rosemary
1 bay leaf
6 cups chicken or vegetable broth or stock
1 pound peeled chestnuts
½ cup cream
¼ pound bacon
Chop bacon strips into one-inch pieces and add to saute pan over medium-low heat. Render the bacon and once cooked, remove with a slotted spoon, leaving behind the grease.
Next up add the celery, carrot and onion to same sauté pan over medium-to-low heat and sweat for 5 min, or until the vegetables become softer and translucent.
Add rosemary and chestnuts and cook for 5 more minutes.
Finally throw in the broth/stock and bay leaf, cook until chestnuts are tender and remove from heat.
Add cream and then puree the mixture until smooth, either with an immersion blender, or in an actual standing blender.
Garnish with the bacon and if you have any sage, feel free to fry some up and garnish with that as well. This makes for a great seasonal cold-weather soup.
Chestnuts are typically stocked at your local grocer seasonally. I once attempted to procure chestnuts in the summer, only to discover no market in San Francisco had them in stock. But come Thanksgiving and suddenly everyone is all about the chestnuts. Go figure. (not to be mistaken for water chestnuts, which are always easy to find). You typically can purchase chestnuts already shelled and in a jar or can soaked in water.
So here's the recipe:
3 tablespoons butter
1 stalk celery, chopped into one inch half moons
1 carrot, chopped into one inch half moons
1 onion, quartered and chopped into one inch half moons
2 tablespoon chopped rosemary
1 bay leaf
6 cups chicken or vegetable broth or stock
1 pound peeled chestnuts
½ cup cream
¼ pound bacon
Chop bacon strips into one-inch pieces and add to saute pan over medium-low heat. Render the bacon and once cooked, remove with a slotted spoon, leaving behind the grease.
Next up add the celery, carrot and onion to same sauté pan over medium-to-low heat and sweat for 5 min, or until the vegetables become softer and translucent.
Add rosemary and chestnuts and cook for 5 more minutes.
Finally throw in the broth/stock and bay leaf, cook until chestnuts are tender and remove from heat.
Add cream and then puree the mixture until smooth, either with an immersion blender, or in an actual standing blender.
Garnish with the bacon and if you have any sage, feel free to fry some up and garnish with that as well. This makes for a great seasonal cold-weather soup.
Wednesday, December 21, 2011
Baked Eggs
I've been wanting to attempt baked eggs for awhile now, but haven't had the proper ramekins, so this holiday season provided the perfect opportunity to try my hand at this dish. Basically you crack eggs into ramekins, surround with a little milk or cream (to avoid burning), and bake for 15 minutes or so. I of course wanted more than just eggs so I layered potatoes, cheese, bacon, onions, and mushrooms.
Begin by cooking your bacon and once rendered remove to paper towels to drain. Slice your potatoes (I used peeled fingerlings) and add them with some minced garlic to the bacon grease to cook.
Once your potatoes are cooked to your liking, start assembling them in your ramekins.
Next up is cheese.
Followed by the bacon.
Meanwhile, saute some onions and mushrooms in the leftover bacon grease (add more butter if needed) and once softened add those to the dishes.
Make room for your cracked eggs in the center of your mount of food.
Finally add a tablespoon of milk or cream atop the eggs. Place on a cookie sheet and bake for about 15 minutes at 325 F.
These ramekins were a little shallow for all the ingredients I tried to cram in them, otherwise the eggs might not have looked so separated from everything else, but it didn't diminish from the deliciousness. Everyone had an individual serving of breakfast goodness all in one place and the baked eggs were an interesting consistency different than what you'd get from frying or poaching.
Wednesday, December 7, 2011
Bacon Wrapped Goat Cheese Stuffed Baked Pears
I was recently gifted pears, which is interesting because I'm not so much a pear eater. I consulted google to determine what I could do with these pears that would possibly appease my fruit-hating palate, and lo-and-behold....bacon was the answer! Big surprise. This recipe had the makings of all the things I love: bacon and goat cheese. The pear became an afterthought, which was fine by me.
Begin by preheating your oven to 350 F, halve your pears, and remove the pits, leaving a nice bowl for your cheese. Place the pear halves on a cookie sheet, fill the scooped out insides with herbed goat cheese, and wrap with raw bacon. So maybe the recipe calls for a single slice of bacon, but obviously that wasn't enough, so I went for two.
Drizzle the pears with a little olive oil and salt and pepper and bake for about 30 minutes (more or less depending on pear size).
Once done, serve over a bed of greens. I used mesclun, but you can also use arugula or whatever you prefer. We made a mild vinaigrette to drizzle over the lettuce before we topped with the pears and drizzled with a little honey. The juices from the pears, the fat from the bacon, and the sweetness of the honey actually combined pretty well with the greens and cheese and made for a surprisingly delicious pear salad...though that could be all the bacon's doing.
I had some leftovers so I reheated the pears in the toaster oven to re-crisp the bacon, and one morning I served this for breakfast over a fried egg. Not bad for a fruit.
Begin by preheating your oven to 350 F, halve your pears, and remove the pits, leaving a nice bowl for your cheese. Place the pear halves on a cookie sheet, fill the scooped out insides with herbed goat cheese, and wrap with raw bacon. So maybe the recipe calls for a single slice of bacon, but obviously that wasn't enough, so I went for two.
Drizzle the pears with a little olive oil and salt and pepper and bake for about 30 minutes (more or less depending on pear size).
Once done, serve over a bed of greens. I used mesclun, but you can also use arugula or whatever you prefer. We made a mild vinaigrette to drizzle over the lettuce before we topped with the pears and drizzled with a little honey. The juices from the pears, the fat from the bacon, and the sweetness of the honey actually combined pretty well with the greens and cheese and made for a surprisingly delicious pear salad...though that could be all the bacon's doing.
I had some leftovers so I reheated the pears in the toaster oven to re-crisp the bacon, and one morning I served this for breakfast over a fried egg. Not bad for a fruit.
Monday, December 5, 2011
Spice Rubbed Pork Chops
Pork chops often frighten people because of how dry they can end up. I discussed this before in a previous post describing stuffed porkchops and how to combat the leather effect. This time I used a dry rub to season the chops and ensured juiciness by purchasing thicker bone-in chops. If you get too thin of chops, chances are they end up dry and unappealing.
Again, the dry rub is a flavoring technique that doesn't involve as much pre-prep as the marinade because it doesn't necessarily require an overnight chill. Choose your favorite spices, mix and apply to the chop, but don't go overboard because it will have a very strong flavor even with minimal spice rub. I combined cayenne pepper, paprika, oregano, cumin, coriander, salt and pepper, and a dash of cinnamon.
Apply the spice rub to both sides and let sit for a few minutes to get an opportunity to adhere and flavor the chops.
Heat a little olive oil in a skillet on medium high heat, and when the pan is nice and hot add your chops. Cook for about 5 minutes per side. You will see nice caramelization of the chops/spices. This is a good thing, and the sear allows for the juices to remain inside the chops rather than seep out.
To ensure a cooked-through pork chop, you can then place a lid over the pan or transfer the pan to the oven. I mentioned this before, but trichinosis (the disease you get from eating undercooked pork) is killed at 145 degrees fahrenheit, which is actually a medium rare chop. People are too afraid of eating pink pork that they always overcook pork to the point of it being way overdone. I like to aim for a medium steak with pork. Most of the pink is gone, but the meat hasn't turned gray and hard from overcooking.
Finally I served these chops with a side of basmati rice I prepared with corn and spinach. The spice rub had a kick to it, so the rice helped cool it down. I drizzled with a tiny bit of olive oil at the end for flavor.
Again, the dry rub is a flavoring technique that doesn't involve as much pre-prep as the marinade because it doesn't necessarily require an overnight chill. Choose your favorite spices, mix and apply to the chop, but don't go overboard because it will have a very strong flavor even with minimal spice rub. I combined cayenne pepper, paprika, oregano, cumin, coriander, salt and pepper, and a dash of cinnamon.
Apply the spice rub to both sides and let sit for a few minutes to get an opportunity to adhere and flavor the chops.
Heat a little olive oil in a skillet on medium high heat, and when the pan is nice and hot add your chops. Cook for about 5 minutes per side. You will see nice caramelization of the chops/spices. This is a good thing, and the sear allows for the juices to remain inside the chops rather than seep out.
To ensure a cooked-through pork chop, you can then place a lid over the pan or transfer the pan to the oven. I mentioned this before, but trichinosis (the disease you get from eating undercooked pork) is killed at 145 degrees fahrenheit, which is actually a medium rare chop. People are too afraid of eating pink pork that they always overcook pork to the point of it being way overdone. I like to aim for a medium steak with pork. Most of the pink is gone, but the meat hasn't turned gray and hard from overcooking.
Finally I served these chops with a side of basmati rice I prepared with corn and spinach. The spice rub had a kick to it, so the rice helped cool it down. I drizzled with a tiny bit of olive oil at the end for flavor.
Subscribe to:
Posts (Atom)