Wednesday, February 20, 2013

Meatloaf

Meatloaf.  A staple of cafeterias, TV dinners, and moms everywhere.  I always keep some ground beef in the freezer for impromptu burgers, burritos, and the like, so I decided to switch it up and go for this old classic.  Now in an ideal world, you would have lots of nice ground meats (beef and pork) to incorporate into your loaf (or get adventurous with lamb and turkey).

The fillings for your meatloaf fall under some basic categories: (day old) crusty bread soaked in milk, ground meat, diced veggies, egg, spices.  

Soak your bread that you rip or dice into cubes.  This adds some texture and airiness in the loaf so it isn't completely dense with meat.  
Next saute your veggies.  This time I had onions, carrots, and garlic to work with.  You don't need to get them completely soft because you will be baking them in the loaf for an hour and the juices from the meat will soften them.  
Now combine your ground meat, 3/4 of the sauteed veggies, soaked bread, one egg, and sauces/spices in a bowl.  It looks pretty gross.  For my seasoning this time I went with some soy sauce, salt/pepper, and thyme.    
With the remaining sauteed veggies, I mixed them with some soy sauce and some ketchup in the skillet.  I then filled a loaf pan with the meaty mixture and spread the ketchup on top.  Add as much or as little of this as you'd like.  
I popped this bad boy in the oven for an hour at 350 degrees.  You can serve with additional ketchup if your diners so desire, or perhaps ditch the ketchup alltogether and go for a gravy instead.  I served with mashed potatoes for a nice hearty meat and potato comfort food dinner.  

Saturday, February 2, 2013

Butternut Squash Tart

A great new recipe I discovered around Thanksgiving offers another use for butternut squash besides the typical soup route.  A crowd favorite, this is a nice hearty appetizers that toes the line between sweet and savory.

Ingredients: frozen puff pastry sheet, butternut squash (preferably whole/fresh and sliced to your desired thinness), 1 egg + water, salt, olive oil, fresh sage leaves, honey or maple syrup, parmesan cheese

Preheat the oven 375 and begin by placing the puff pastry sheet on a parchment paper lined cookie sheet.  Beat the egg and a tsp of water to make an egg wash and brush it over the puff pastry.  Arranged your butternut squash slices evenly over the pastry, overlapping as you see fit.
Cover the squash covered pastry with more parchment paper and another cookie sheet of something with a little weight to press down on the squash before putting it into the oven.  As it bakes, the moisture in the squash won't evaporate leaving it dry, but allow for steam cooking.  Bake for about 10-15 minutes.  When you notice some puffing of the pastry, but not browning on top, you're good.
Remove the top layer of parchment paper and cookie sheet, brush or drizzle with olive oil and return the squash pastry to the oven.  Bake for an addition half an hour or so, uncovered, until the squash looks cooked to your doneness (you can poke it with a toothpick or fork to make sure it is soft enough), and the pastry is a light golden brown, but not a burnt mess.
The suggested toppings for the tart are a chili-infused honey, fried sage leaves, and freshly shaved parmesan cheese.  When I made this, we did not have honey and one of our diners was not a fan of spicy things, so for the drizzle, we went with maple syrup instead.  I wanted the syrup to be thicker though, so in a saute pan I heated a few tablespoons of syrup with about half as much water, cooked to a boil, then simmered while it reduced and thickened.  For the fried sage, heat the olive oil in a shallow skillet over medium-high heat and add the fresh sage, one leaf at a time.  It will bubble/pop because of the moisture in the leaves, and it will fry quickly so remove the leaves with tongs after about 5-10 seconds on each side in the oil.

Top the tart with the honey or syrup drizzle, the fried sage, and the cheese (preferably freshly shaved parmesan, but we only had pre-grated).  Slice into individual squares and serve!

Sunday, January 13, 2013

Roasted Green Beans

I have recently become a big fan of roasting vegetables as a nice rustic side dish for heartier meals.  Today's recipe comes from my Thanksgiving dinner (a bit delayed in the posting, yes).  Rather than the "traditional" green bean casserole doused in soup, I wanted something with more of a bite and less heavy, since Thanksgiving meals are already so good at weighing us down without an added casserole masquerading as a healthy veggie side dish.

The setup is simple.  Veggies, olive oil, garlic, spices.  I roasted some root veggies for Christmas (sorry no pics) and followed the same system (carrots, sweet potatoes, parsnips, turnips, garlic, olive oil, sage).

For this preparation I took fresh green beans with both ends chopped off, fresh scallions cut to the same length as the green beans, a couple tablespoons of minced garlic, fresh sage (~30 whole leaves), dried thyme (~2 tsp), and dried rosemary (~2 tsp).  I drizzled with olive oil (probably about 2 - 3 tbsp) and mixed until everything was lightly covered.
Lay the beans out on an oven rack and bake in a 400 degree oven for an hour.  Every 10-20 minutes or so I went through and tossed the beans with tongs to move them around on the tray so there was even cooking.
And that's it!  Once done you have some nice caramelization on parts of the beans, a good balance between crisp and "soggy" bites, and a good foundation for any of the gravies or sauces you'll be serving with your entree rather than coming to the party with its own sauce.

Monday, December 24, 2012

Duck with a Plum Marmalade

We cut this recipe out of the newspaper years ago, and it is always a crowd pleaser.  Duck seems like such a decadent meat, probably due to the fatty skin, and a rich marmalade really complements it nicely.

Marmalade Ingredients: 1/2 cup diced red onion, 1 tsp minced garlic, 2 large plums diced, 2 tbsp brown sugar, 1/2 cup chicken broth, 1/4 cup balsamic vinegar, salt/pepper

Begin with the marmalade since it can be made a day ahead of time, or it can sit while you cook the duck.  Add your onion and garlic to a tbsp of olive oil to saute.
Once softened, add the plums.  Now we had trouble finding fresh plums in November, so we went with canned plums.  These work well since you're using them for a sauce as opposed to eating whole.  Don't go with dried plums.  We did find fresh pluots, which would also substitute nicely.  
After a few minutes when everything is nice and soft now, add the brown sugar then the broth, vinegar, and salt/pepper.  
One of our diners is allergic to balsamic so I cooked it with just the broth first, then once reduced, portioned some out for her and added the balsamic to the rest of the ingredients.  Cook for several minutes until the sauce is very thick...like a marmalade...that's when the flavor is strongest and the broth/vinegar are reduced enough.  
You can set aside the marmalade until ready to serve, or cook the duck concurrently, but if you cook the duck at the same time, make sure the duck doesn't finish before the sauce because either your duck will get cold, or you'll be forced to overcook it...neither one ideal.  

For the duck, season both sides with salt and pepper, heat some butter and olive oil in a skillet and add the duck breast, skin side down to begin searing.  
Cook for about 5 minutes on the skin side over medium/high heat.  There may be some splatter, so feel free to cover the pot with a splatter shield, but don't cover with a lid just yet.  Once you can see some of the meat above the skin cooking, flip the duck to heat the other side.  Cook at this point until your desired doneness.  I prefer my duck medium rare, so I char both the fat and the meat, then flip back over to the skin side and put a lid on the skillet for another 2 minutes or so to allow the heat to cook the insides.  

To serve, slice each breast and fan out the pieces on the plate.  If at this point you find your duck is undercooked, go ahead and place the slices back in the skillet over medium heat, but only heat on one side, so the remaining side stays pink, yet you maintain proper cooking.  Spoon the marmalade over the duck or to the side.  We served with rice and brussels sprouts and the marmalade tasted nice on the sides as well as the duck.  

Saturday, October 27, 2012

Shrimp Ratatouille


This is my variation on a ratatouille.  I pretty much define ratatouille as a vegetable stew with a tomato sauce base.  Typically squash and eggplant are involved with other veggies, spices, and the tomato sauce.  For this variation I was lacking the eggplant but included shrimp and served it over rice with a dollop of hummus on top.

So the first step is to saute your base vegetables.  I used zucchini, onion, mushrooms, and garlic in a little olive oil until they were slightly browned and mostly softened (about 5-10 minutes).
Next I added the tomatoes.  I used canned diced tomatoes with the juice included.  Perhaps you would like to make your own sauce, or take a pre-made tomato sauce, but I find the caned variety do the trick when you add enough extra herbs/spices and the liquid cooks off.  
I added salt/pepper and thyme (and would have added oregano or marjoram had I had some) and allowed this mixture to stew for about 10 minutes before adding the shrimp and some frozen spinach.  
I let this stew for about 5 minutes until the shrimp were cooked completely.  You don't want to stew shrimp for too long because they'll end up getting tough and chewy, so add them right before you're ready to serve your dish.  I scooped this over some white basmati rice, but this is also typically a side dish in French cuisine, so without the shrimp this could go well with chicken, steak, or fish...just don't pair it with another stew because then you have too many competing sauces going on.  

Saturday, October 20, 2012

Lemon White Wine Chicken Over Rice

I made a thick lemon wine sauce for some chicken tenders to eat over rice pilaf.  This way it felt like the sauce had substance, but it used lighter ingredients and flavors to be a little more subtle.

First up, I sauteed my veggies (garlic, onion, mushrooms) in a little olive oil (butter works well too).
Once softened and a little browned, if there is no oil/butter left in the pan, add about a tablespoon more and add some flour (1-4 tbsp depending on how thick and what quantity of sauce you want).  This will act as the thickening agent.  Stir everything well and you've got yourself a roux.
To the veggies/roux, add your white wine.  (Broth is also acceptable, or a combination of the two for a subtler wine flavor).  I used a pinot grigio, but chardonnay works well too (just use what you like/have).
As you stir, the sauce will thicken as the wine combines with the roux.  At this point you can add about a tablespoon of lemon juice.  This is when I added my (still raw) chicken tenders, so that they could cook in the sauce, but if you feel more comfortable using precooked chicken, that is also fine.  I put the lid over this to allow the chicken to steam in the sauce and to avoid too much evaporation.
Once cooked through, I plated the rice, added the chicken on top, then continued cooking the sauce over medium heat to get it to the desired consistency.  You can add a little more lemon juice here if you want that flavor to pop out, or more wine if you lost a lot of liquid volume while cooking.  Fresh herbs (like parsley, tarragon, thyme) would be a great addition here (I added pepper and dried tarragon because I didn't have any fresh).  If you want it to be a real cream sauce you can also add maybe a quarter cup of heavy cream or a tablespoon or two of butter.  I did not do that this time.  But once I poured the sauce over the chicken I did garnish with freshly grated parmesan.

Sunday, October 7, 2012

Stuffed Cabbage

I inherited some cabbage awhile back and not having used it before, I decided to follow some Russian influences and make some stuffed cabbage.  The key for this dish is to boil the cabbage first so the leaves are malleable as you go to stuff them.  Then what you stuff them with is entirely up to you.  I used chicken, rice, and veggies for mine.

So first up, cut the cabbage in half and add the halves to boiling water.  You will lose the integrity of some of the leaves for wrapping, so some wraps may involve 2 leaves instead of 1.  But do be sure you split the cabbage in half lengthwise (so the stalk gets cut in half, otherwise every leaf will be cut in half.
Meanwhile, prepare your filling.  I cooked brown rice according to package instructions, and sauteed some red onions, mushrooms, and garlic in a little olive oil.
Once softened I removed the veggies to the sauce pan containing the rice and sauteed my chicken which I had chopped into 1/2 inch cubes.
Once the chicken was fully cooked, I transferred it too to the rice and veggies and made sure everything was nicely mixed.  I also added diced fresh tomatoes, chopped scallions, salt, and pepper.  
By this point, the cabbage was fully boiled (at least 20 minutes, but longer depending on how cooked you like your cabbage).  Carefully remove the hot cabbage from the water and when cool enough to handle, separate the leaves into individual "bowls" for stuffing.  To each leaf I added a spoonful of my stuffing and topped with freshly grated cheese.
At this point, roll them like a burrito and the next step is at your discretion.  I placed them seam-side down back into the skillet to char a little bit, but also heat through.  You could also put them in a baking dish and put them in the oven for 10-20 minutes.  I added a little broth to get a little steaming action going on, but if you have a sauce prepared, such as a tomato sauce, creamy bechamel, or something else you prefer, you can cook the wraps in the sauce.

To serve, I plated my wraps and added a dollop of sour cream (which is often served with stuffed cabbage at Russian restaurants, only it is a slightly different consistency than the sour cream available in US supermarkets).

Tuesday, July 31, 2012

Salmon and Collard Greens

I inherited some collard greens recently, and never having cooked them before, I decided they obviously needed to be wilted with bacon grease.  We couldn't make this dinner too healthy, could we?

First I cooked the chopped bacon and removed it from the pan to a paper towel, then utilized the grease to cook the chopped red onion and garlic.
Once softened, I added the freshly washed collard greens to the skillet.  I ripped them up a little, but you don't need to chop them too finely because once they wilt it will be like nothing is left of the original leaf.  
After a few minutes the greens will become wilted.  You can also add some water or broth to aid in the wilting process if you're low on grease/oil.  
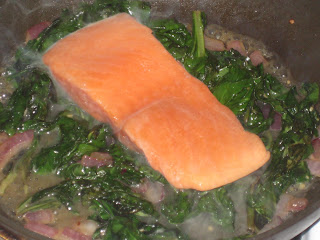
At this point I added some chicken broth and then put my salmon on top of the collard greens to let the greens continue to stew and the salmon could be steamed from the heat of the greens.  
I put a lid on the skillet and cooked for about 10-15 minutes to allow the fish to cook and the collard greens to soften more.  Once done I cooked without the lid to allow the last of the broth to evaporate.  I then mixed the bacon back in with the collard greens and plated them with the salmon.  

Sunday, June 17, 2012

Shrimp Sandwich

I'm a fan of a good sandwich, and when you're lucky enough to get fresh ingredients and good bread, you're pretty much guaranteed a tasty sandwich.  This particular lunchtime delight features shrimp, avocado, bacon, tomato, goat cheese, mayo, and a little parmesan for good measure on Tuscan Pane bread. 
Toast your bread.  I toasted one slice with some parmesan cheese to melt into it.  Spread your condiments of choice on each side.  Slice your toppings and layer away.  I did avocado on one side, since the avocado would stick well to the bread when it came time to flip.  Then the other side I started with the bacon and weighted it down with the tomato slices.  Next I topped with the shrimp that I quickly poached to cook through beforehand.  I added the goat cheese for the final touch, combined the two sides, and sliced on a bias down the middle. 

Wednesday, June 13, 2012

Teriyaki Shrimp over Israeli Couscous and Endive

Trader Joe's offers a new Harvest Blend product featuring Israeli couscous, red and green orzo, split dried garbanzo beans, and red quinoa.  I decided to try this new mix, but obviously needed something with more flavor to serve atop it.  I had some shrimp, veggies and teriyaki, so figured that would be a bold enough taste.  And for good measure I threw some belgian endive leaves on the bottom to add a little fresh crunch.

Saute your veggies as per usual.  A little mushroom, red onion, and garlic in olive oil is what I went for this time.
Add the shrimp and then the teriyaki.  As the shrimp cooks it will draw in the flavor.  Add more teriyaki as desired for a saucier product.  Or for a less strong taste, add some broth at this point to cut the flavor of the teriyaki.
Assemble your endive on the plate.  You could chop it up if you want it to be more salad-like, but I also utilized these as little handheld cups of couscous and shrimp.  Very graceful.
Pile your grains, rice, etc. on top.  Then you just top with the shrimp mixture and let the juices seep in.  This way you get your salad, grains, and fish all in one bite!