Trader Joe's offers a new Harvest Blend product featuring Israeli couscous, red and green orzo, split dried garbanzo beans, and red quinoa. I decided to try this new mix, but obviously needed something with more flavor to serve atop it. I had some shrimp, veggies and teriyaki, so figured that would be a bold enough taste. And for good measure I threw some belgian endive leaves on the bottom to add a little fresh crunch.
Saute your veggies as per usual. A little mushroom, red onion, and garlic in olive oil is what I went for this time.
Add the shrimp and then the teriyaki. As the shrimp cooks it will draw in the flavor. Add more teriyaki as desired for a saucier product. Or for a less strong taste, add some broth at this point to cut the flavor of the teriyaki.
Assemble your endive on the plate. You could chop it up if you want it to be more salad-like, but I also utilized these as little handheld cups of couscous and shrimp. Very graceful.
Pile your grains, rice, etc. on top. Then you just top with the shrimp mixture and let the juices seep in. This way you get your salad, grains, and fish all in one bite!
Chronicling my daily meals to showcase recipes, techniques, and restaurant fares. This is a blog to explore my love of all things edible and the processes behind them.
Showing posts with label teriyaki. Show all posts
Wednesday, June 13, 2012
Sunday, October 30, 2011
Teriyaki Shrimp Fried Rice
What do I do when I have leftover rice? Stir-fry! It's a very simple and quick dinner. Take the meat and veggies you have, choose your sauce/spices, heat it all together, and you're done.
I started with a little garlic and chopped red onion in some butter. Then I added the asparagus. After about 5 minutes I added corn and spinach and the raw shrimp. After everything was sauteed to my liking, I pushed the veggies/shrimp to the side of the pan and added the already cooked rice to the skillet. I let it cook a little in the butter and then added teriyaki sauce. After another minute or two I mixed everything together and cooked over medium-high heat to give the rice a nice little crunch.
Finally, I pushed the rice/veggies/shrimp to the edges of the skillet and in the middle I cracked an egg. I scrambled it by itself and when it was fully cooked I mixed it all together. I added a little more teriyaki sauce to my liking, and in about 10 minutes I had a fully seasoned, fresh cooked stir fry dinner.
Saturday, May 28, 2011
Teriyaki Pork Tenderloin
My apologies for the extremely long blog hiatus. Would you believe I went the entire month of April without making a single new dinner item? Lots of restaurants and boxed meals meant a little neglect for LND. Now I've got a little backlog from May that it's probably about time to address. So I bring you: pork tenderloin.
I'm a fan of baking pork tenderloin and then slicing it before serving. I find the pork remains rather juicy/tender this way, and one of my biggest gripes about pork is that it can be prepared and served too dry, ending up like shoe leather. Baking the pork tenderloin in its entirety at a low enough heat and not overdoing it is the key.
This meal is rather simple. Purchase a tenderloin, and season accordingly. If you plan on using a wet marinade, soak at least overnight (I opted for a simple teriyaki marinade). If using a dry rub, you don't need to let it sit before you bake. Place your tenderloin in a roasting pan and heat in a 400 degree oven for about 20-30 minutes, depending on thickness and desired doneness.
Interesting fact about trichinosis: it is actually killed at 145 degrees Fahrenheit, which translates to a medium-rare pork. But the FDA or whoever is so worried about undercooked meat that they scare us into thinking pork has to be completely well-done to be safe. I know if I was served pink pork, I'd be a little nervous. Thanks a lot government scare tactics. The best way to check doneness is to use a meat thermometer. Determining temperature based on color and how cooked the meat is isn't the best. If you're still wary about eating rare pork, let it go to 150 or 155 degrees. A nice medium to medium well. The flavor and juiciness will turn you into a believer that overcooking pork is no longer necessary.
Once out of the oven, slice and serve. I quickly seared the pork slices after I cut them because I was starving and they weren't cooked enough, hence why the picture indicates a charred exterior on all the slices. Don't be lazy or start cooking this meal when you're already starving. It still tasted great, but I lost a little bit of the juiciness thanks to my impatience.
Tuesday, August 31, 2010
Sliders!
| Bacon Teriyaki, Bernaise Balsamic, Bacon and Blue |
For the burger patties: Ground beef (I used 80/20), diced mushrooms, diced garlic, marinade (add diced onions if you have any...I didn't)
My two marinades: Balsamic vinegar or Teriyaki/soy sauce/sesame oil/sesame seeds
Cheeses: Roquefort, Parmesan, Cheddar, Feta (not pictured)
Toppings: Bacon, Scallions
Sauces: Mayo, Bernaise
Bread: Tuscan Pane (from Trader Joe's) lightly toasted
I enjoy marinading my ground beef to add flavor in the burger when you bit into it. I opted for two marinades last night: a balsamic and a teriyaki. I also enjoy throwing diced mushrooms and/or onions in with my ground beef to cook within the burger itself. Another dimension of added flavor and texture.
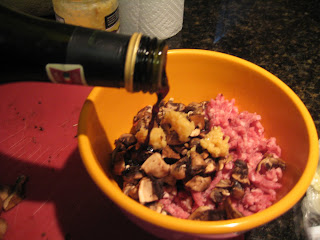
| Ground beef, garlic, mushrooms, balsamic. Don't be afraid to get your hands messy when you mix it all together. |
It's important not to squish your burgers down as they cook, no matter what surface you're cooking them on, because that's how they lose all their good juices from the inside and you're left with a dry, unappealing burger. You can squish once they're in the bun. So cook these, turning over periodically until they're cooked through to your liking. When almost done, you can add the cheese on top to melt before assembling your burgers. I also like using bread instead of hamburger buns because I don't have to buy something special for these, and I actually love the taste/toasty texture.
So what were my final creations? At the bottom of the first picture is your classic "bacon and blue" with the Roquefort cheese, bacon, scallion, and mayo. This used the balsamic burger. Going up clockwise we have a traditional bacon burger with cheddar cheese and mayo. This utilized the teriyaki burger. And my favorite of the night was the balsamic burger topped with parmesan, scallions, and bernaise sauce (bringing the steakhouse to the burger joint). I had a ton of leftovers, so I must admit I nibbled later on a balsamic burger topped with feta, scallions, bacon, and bernaise sauce sans bread.
Proof that you don't need a grill and don't need to settle on a single burger for dinner.
Subscribe to:
Posts (Atom)