Showing posts with label bread. Show all posts

Wednesday, February 20, 2013

Meatloaf

Meatloaf.  A staple of cafeterias, TV dinners, and moms everywhere.  I always keep some ground beef in the freezer for impromptu burgers, burritos, and the like, so I decided to switch it up and go for this old classic.  Now in an ideal world, you would have lots of nice ground meats (beef and pork) to incorporate into your loaf (or get adventurous with lamb and turkey).

The fillings for your meatloaf fall under some basic categories: (day old) crusty bread soaked in milk, ground meat, diced veggies, egg, spices.  

Soak your bread that you rip or dice into cubes.  This adds some texture and airiness in the loaf so it isn't completely dense with meat.  
Next saute your veggies.  This time I had onions, carrots, and garlic to work with.  You don't need to get them completely soft because you will be baking them in the loaf for an hour and the juices from the meat will soften them.  
Now combine your ground meat, 3/4 of the sauteed veggies, soaked bread, one egg, and sauces/spices in a bowl.  It looks pretty gross.  For my seasoning this time I went with some soy sauce, salt/pepper, and thyme.    
With the remaining sauteed veggies, I mixed them with some soy sauce and some ketchup in the skillet.  I then filled a loaf pan with the meaty mixture and spread the ketchup on top.  Add as much or as little of this as you'd like.  
I popped this bad boy in the oven for an hour at 350 degrees.  You can serve with additional ketchup if your diners so desire, or perhaps ditch the ketchup alltogether and go for a gravy instead.  I served with mashed potatoes for a nice hearty meat and potato comfort food dinner.  

Sunday, June 17, 2012

Shrimp Sandwich

I'm a fan of a good sandwich, and when you're lucky enough to get fresh ingredients and good bread, you're pretty much guaranteed a tasty sandwich.  This particular lunchtime delight features shrimp, avocado, bacon, tomato, goat cheese, mayo, and a little parmesan for good measure on Tuscan Pane bread. 
Toast your bread.  I toasted one slice with some parmesan cheese to melt into it.  Spread your condiments of choice on each side.  Slice your toppings and layer away.  I did avocado on one side, since the avocado would stick well to the bread when it came time to flip.  Then the other side I started with the bacon and weighted it down with the tomato slices.  Next I topped with the shrimp that I quickly poached to cook through beforehand.  I added the goat cheese for the final touch, combined the two sides, and sliced on a bias down the middle. 

Tuesday, February 28, 2012

Pesto Chicken Sandwich

Today I have yet another delicious lunchtime sandwich option for you all.  I was craving some chicken pesto the other night, but decided it was more of an afternoon meal, so the next day I went to town.  Pretty much all you need for this is chicken and pesto sauce and the rest of the accompaniments are up to you.  I would've liked some avocado or maybe some lettuce or fresh tomato, but alas you use what you have, and here is what I made given the ingredients in my fridge.  Granted, it was still obviously a delicious and decadent sandwich.   

1. Toast your bread.  I went with sourdough. 
2. Cook your bacon.  I did this in a pan on the stove. 
3. Cook your chicken.  I used two chicken breast tenders which I first seared in the bacon grease, but then ultimately poached in a little broth/water combo.  This was to make sure it would cook through and remain moist.  When it was pretty much done, most of the liquid had evaporated so I spread a thick slab of pesto on top of the chicken, put the lid on the saucepan and cooked another 3-5 minutes.
4. Assemble.
On one slice of the bread I placed some red onion slices, covered with my bacon strips, and crumbled some herbed goat cheese on top.  On the other slice of bread I spread a coat of mayonnaise, placed my two chicken slices on top, and shaved some fresh parmesan cheese onto the still hot chicken so it would melt. 

Carefully flip over one of the sides of the sandwich.  Press together lightly, slice on the bias, and enjoy this cheesy, pesto-ey, meaty deliciousness. 

Friday, February 24, 2012

Nutmeg Scones

Who doesn't like a good breakfast pastry?  Scones are great because they're a flakier, slightly sweeter version of say toast or an english muffin, but not quite as deviant as, say, a bear claw or danish.  I like to put out scones at brunches, and they're always a hit, sometimes prompting an intense scone vs. crumpet debate (crumpets are more porous and contain yeast, where scones instead utilize baking powder.  scones also originated in Scotland while crumpets came from Wales).

My favorite scone recipe includes nutmeg and so the other morning I adapted the ingredients around what I had and the quantity of scones I was hoping to make.

Ingredients:
1 cup flour 
1/8 cup sugar
1/2 + 1/4 tsp baking powder
1/8 tsp baking soda
1/4 tsp salt
1/4 tsp nutmeg
1/4 cup butter
1/4 cup sour cream
1 egg

I typically utilize a food processor to make scones, but all I currently have in my kitchen is a mini processor, hence the tiny proportions of ingredients.  Feel free to multiply the above ingredients if you have a larger preparation vessel. 

Step 1: combine the dry ingredients (the first six on the above list)
Step 2: Add the butter.  Make sure your butter is still cold and chopped into a cubes (a must in most dough recipes).  This is why the processor is ideal because the blade helps cut the butter into the dry ingredients, much more easily than if you attempted this by hand. 
Step 3: Add the wet ingredients (egg and sour cream):
Once completely pulsed, you'll get a crumbly mixture.  Pour it onto a floured surface and knead into a large ball of dough.  Separate the dough in half and depending on the size of scones you want to make, cut them accordingly.  I made 8 mini scones so I hand patted each half of the dough into a square and cut it in quarters along the diagonals. 

Spray a baking sheet with cooking spray and place your scones on top.  For added flavor, sprinkle some sugar and nutmeg atop the scones before baking.  For even more added crunch, create an egg-white wash (just whisk egg whites and water) and rub/paint a little on top of the scones before adding the sugar/nutmeg.  Then bake for 10-15 minutes in a 350 degree oven. 
Serve warm when the flakiness can be most appreciated.  Serve with devonshire cream or lemon curd like at a fancy tea establishment or simply butter or jams.  Or you could use nothing at all, since they have enough flavor to stand out on their own. 
lemon curd!

Monday, September 26, 2011

Banana Bread

I'm a big fan of banana bread.  Every time I buy bananas and don't get around to eating them before they turn brown, I throw them in the freezer and accumulate them until I have enough to make a batch of banana bread.  I have tried many recipes.  Some use milk, some use cinnamon, some are dense, others are fluffy.  My current favorite recipe doesn't use many ingredients, but it does use brown sugar in lieu of granulated sugar.  I also may notoriously undercook my baked goods, but I haven't had any complaints yet, so if you are so offended, just leave the bread in the oven the extra ten minutes.

2 cups all-purpose flour
1 teaspoon baking soda
1/4 teaspoon salt
1/2 cup butter (softened, not melted)
3/4 cup brown sugar
2 eggs
2 - 3 overripe bananas

Step 1: Acquire over-ripened bananas.  Yes, they are brown and look like this:  Don't fret.
Step 2: Cream butter and brown sugar in a bowl.  This is much easier with an electric mixer, but I had to suffer through hand mixing (woe is me).  Once creamed, add the eggs and the bananas.  Lumpy is ok.  
Step 3: Combine flour, salt, and baking powder and slowly add to the mushy banana mixture until everything is combined.  At this point add any extras you want: nuts, chocolate chips, or nothing at all.
Step 4: Pour into a greased baking dish (preferably a loaf pan, but use what you have) and bake for an hour to an hour and 10 minutes.
Step 5: Remove from oven.  Test doneness with a toothpick.  Slice and serve!

Wednesday, March 23, 2011

Open Faced Shrimp Melt

Okay, so I realize this is very similar to the shrimp melts I posted a couple months ago, but it was so delicious last night that I felt the need to document and share.  This turns the appetizer portion into a meal.  Add whatever you like on your sandwich, and use two slices of bread if you want.

Ingredients: Shrimp, tarragon, white wine, water, scallions, mayo, lettuce, bacon, bread, cheddar cheese

First, prepare the shrimp.  Always start with raw shrimp.  It's cool if the shrimp is frozen, as long as it isn't cooked already.  That produces the best texture and taste.  I poach the shrimp in a 1:1 mixture of white wine and water with about a tsp of dried tarragon over medium heat.

I left the tails on for the poaching, but you don't have to.  After about a minute or two on each side, your shrimp should be cooked through.  Remove from the poaching liquid and set aside to cool.  Once cool, remove tails and chop into thirds.

Meanwhile, cook your bacon, toast your bread, and prep your lettuce.  Thinly slice a scallion and add it to a mixing bowl.  Add the chopped shrimp to the scallions and coat both with mayonnaise.  Use as much or as little as you like.  I probably used 1 to 2 tbsp.  Add a little salt and pepper and if you want more tarragon you can add that too.  A splash of lemon juice or chives are also suitable additions.

Assemble the sandwich.  Bread.  Lettuce.  Bacon.
Now it is up to you how you want to melt the cheese on your sandwich.  I usually put the shrimp mayo mixture on top of the bacon and coat with grated cheddar cheese, then place the entire sandwich in a toaster oven to melt the cheese.  Last night I instead opted to heat just the shrimp with the cheese on top so as to not cook the toast, lettuce, or bacon any more.  Once the cheese was melted, I scooped the cheesy shrimp on top of the bacon.


I ate with my hands, but obviously if you're classy you'll use utensils.  I'd also suggest throwing some avocado on top, but I alas did not have any.  Ideally, I would serve this on a dutch crunch roll, but the shrimp is so good it can work with whatever bread you give it.

Saturday, January 22, 2011

Stuffed Pork Chops

I've become quite a fan of stuffing pork chops because I find it helps keep them tender thanks to the slight moisture from the stuffing.  I first started stuffing pork chops when I had leftover stuffing from thanksgiving, but you don't have to stuff them with just bread.  Some people like apples with their porkchops, or you could do all veggies, or maybe even rice if you wanted something else starchy.  But here's what I did this time around.

Stuffing: toasted bread cubes, leeks, mushrooms, garlic, chicken broth, oil/butter
Sauce (optional): white wine, butter, flour

Preheat your oven to 375.

I didn't have any leftover stuffing this time, so I made my own.  I took two slices of sourdough and two slices of wheat bread, chopped them into cubes, put them on a cookie sheet, drizzled with a tiny bit of olive oil, and baked for about 12 minutes.

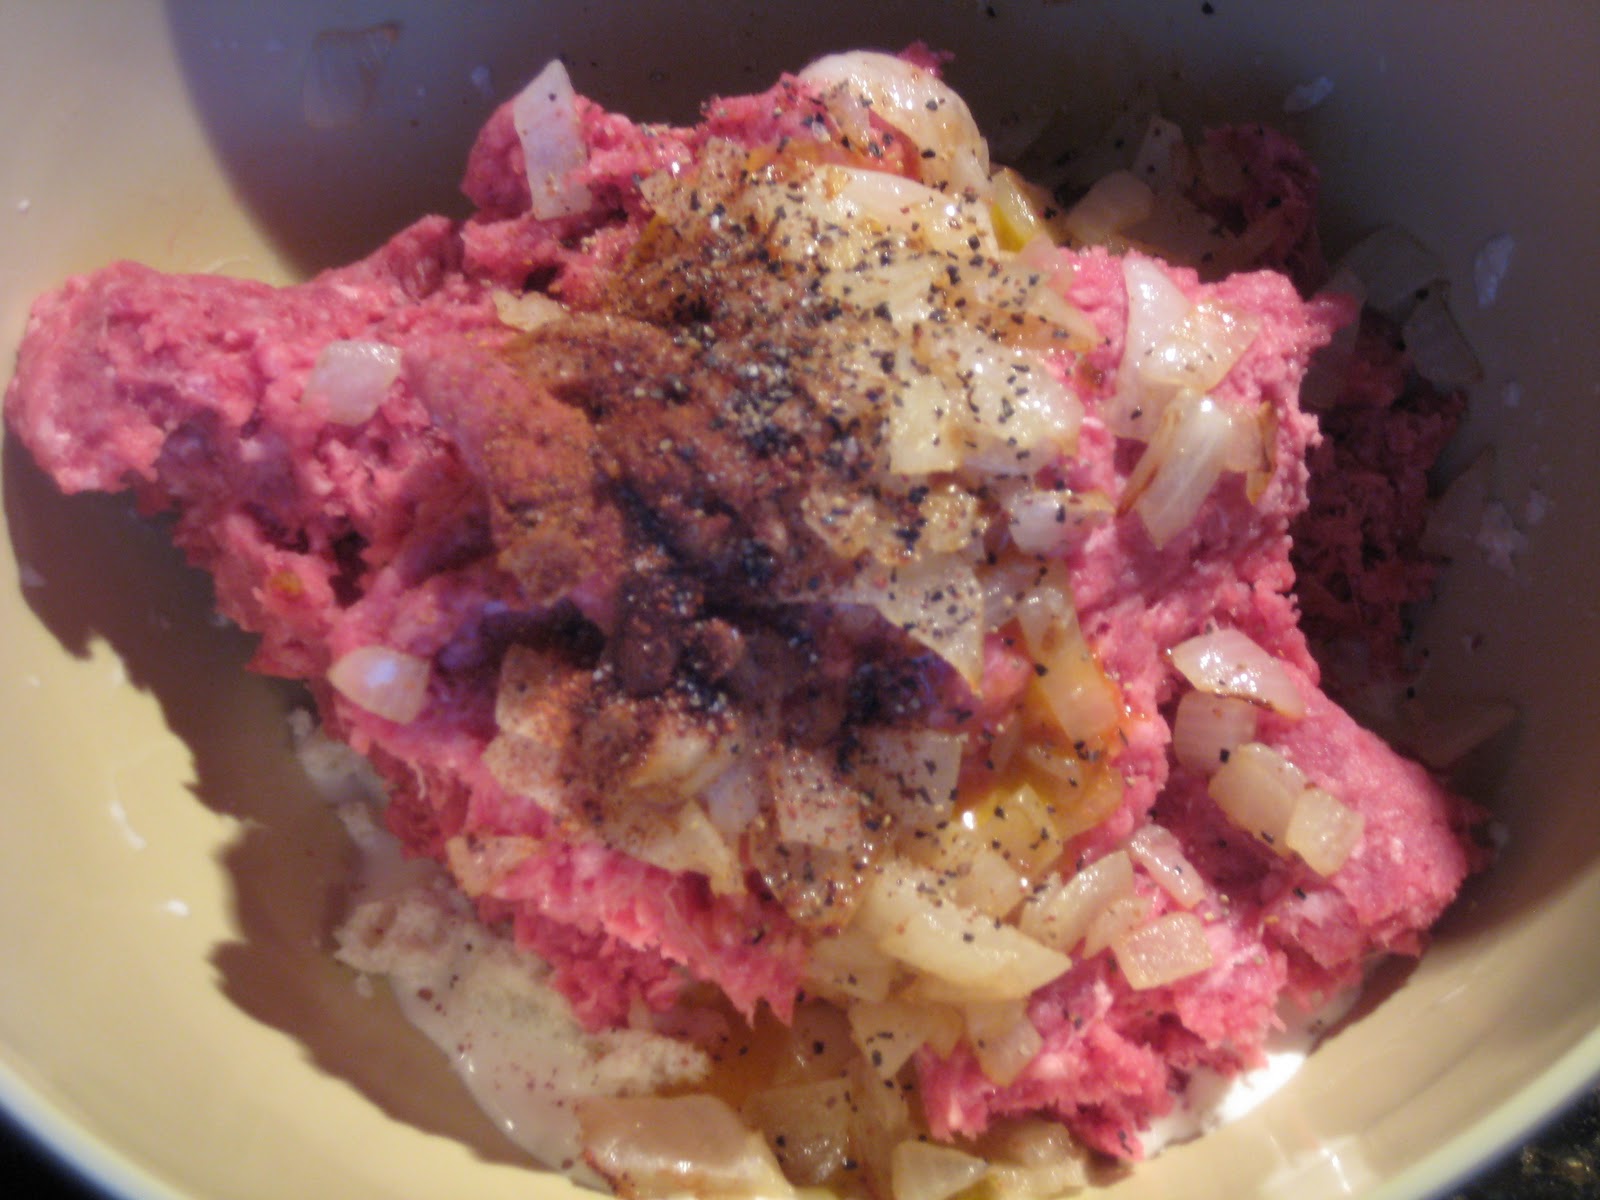
Meanwhile, in a saute pan, I added the chopped leeks, mushrooms, and garlic to a little oil or butter.  Once softened, add the toasted bread and cook for about a minute or two.  Then add the chicken broth.  I eyeball it.  Starting with a small amount, maybe 1/4 of a cup for this quantity of bread.  You want the bread to absorb the liquid, but you don't want extra sauce sitting in the pan, and you don't want your bread to be too soggy.  It should look like this:
To prep the pork chops, you'll want to butterfly them.  Basically use a paring knife to cut directly in the center of the chop and make a little pocket for the stuffing.  Once butterflied, stuff the chops, and you may want to use a skewer or toothpick to help keep the stuffing in place while they cook.  If you have a skillet that can be used on the stove and in the oven, cook your chops in that, otherwise you'll have to transfer them to an oven proof roasting pan.  In said skillet with a little butter or olive oil, sear the outside of the chops.  
After about 5 minutes (depending on the thickness of your chops) turn them over and sear the other side.  After another 5 minutes transfer to the oven to cook through.  This will probably take about ten to fifteen minutes or so.  You don't want to overcook and dry out the chops, but you don't want the inside to be pink.  Though, trichinosis is actually destroyed at 145 degrees F, which corresponds to a medium rare pork chop.  Most people are afraid to eat a pink chop, but just know if your temp is hot enough, you don't have to worry about disease.  

When done, plate the chops and add a little more stuffing on top if you'd like (I served with mashed potatoes, big surprise there), and I made a quick sauce to pour over.  Deglaze your skillet with some white wine to soak up all those great pan drippings.  As the sauce cooks and thickens, you can add a tiny bit of flour if you want it to be thick and creamy, otherwise you can add a little bit of butter to have a similar, but less thickening effect.  Spoon over the chops, and enjoy!
  

Saturday, December 11, 2010

LND: Lunchbox Edition - Grilled Cheese

The art of the grilled cheese sandwich.  It does not involve a microwave or toaster oven, but rather a skillet or grill if you are lucky enough to have an industrial kitchen at your disposal.  Get yourself some nice rustic bread, pick your favorite cheeses, and decide what other veggies or fillings you might be in the mood for.  I'm a big fan of avocado and tomatoes in my grilled cheese, but some days you work with what you've got.

This grilled cheese consisted of: Sourdough Rye bread, shredded cheddar cheese, herbed goat cheese, and red onion. 

The trick is to prepare the sandwich without burning the bread, but still completely melting the cheese.  Here's how I do it.  Heat the skillet over medium heat and add two bread slices.  Let them get warm, then remove.  Add a little butter to skillet, flip over the bread slices, and put them back in the skillet.  This way the side that will be touching the cheese is already warm while the outer side can begin to crisp in the butter.  Add the cheese at this point.  I added the cheddar to both slices of bread so there wasn't one piece covered in cheese that needed to melt, but both sides could take the same amount of time to cook.  I then added the red onion slices and the goat cheese to each slice of bread.


Since I love cheese, I piled a little more cheddar on top of the goat cheese at this point.  Once ~90% melted, put the two slices together and continue to cook about a minute on each side until the cheese fully melts and the slices meld together.

Slice asymmetrically, pile artistically, and take a picture.  Or just start eating.

Sunday, December 5, 2010

LND: Wake Up and Smell the Bacon

My favorite brunch item is most definitely Eggs Benedict.  It's because of the Hollandaise sauce. but I could do without the Canadian bacon.  So when I have time for making my own weekend brunch, I'm a fan of Benedict variations, with or without the sauce. 

Thanksgiving weekend we had leftover mini english muffins from the shrimp melts, but no hollandaise sauce so I came up with this version: Toasted English Muffin, Bacon, Avocado, Pesto sauce, Garlic/herb cheese spread, Poached Egg.  The runny yolks provided all the "sauce" we needed for what a restaurant might deem a "California" benedict.  (apparently California is all about avocados and bacon, at least that's what I've learned from ordering the "California" version of many restaurant menu items).

To prepare, toast the English muffin halves, crisp the bacon, slice the avocado.

To get perfectly poached eggs, bring a pot of salted water to a boil.  Using a slotted spoon, spin the water in a circular motion to create movement in the pot.  Crack an egg into a small prep bowl and quickly remove the spinning spoon and add the egg to the center of the spinning water in the pot.  This causes the white to wrap around the yolk and avoid all the extra stringiness that can come from plopping a raw egg into a regular pot of boiling water.  

Assemble.  Spread a light layer of pesto on the toasted english muffins.  Add a dallop of cheese (I used Alouette brand spreadable garlic/herbs cheese).  Top with bacon, two avocado slices, then nestle the poached eggs on top, using the slotted spoon to remove them from the boiling water.  Sprinkle with pepper and serve.

Tuesday, November 30, 2010

LND: Entertaining Recipes - Shrimp Melts

Happy week after Thanksgiving, loyal readers!  I hope you find yourselves well-fed, well-rested, and with plenty of leftovers.  This year, I was in charge of the appetizers for our 35 person Thanksgiving dinner, so I present to you, recipes for entertainment.


Ingredients: English muffins, Shrimp, Mayonnaise, Tarragon, Scallions, Cheddar Cheese, White Wine

To make these delightful morsels bite sized, we searched high and low for miniature english muffins, since we wanted to be classier than cutting the larger-sized ones in half.  We resorted to ordering them from the internet.  Great for presentation, also great if you're happy to have 6 bags of 12 muffins each to satisfy those english muffin cravings.

Step 1: Cook the Shrimp.  I like to buy the giant bags of raw, peeled/deveined shrimp.  It's easy, it's quick, but you don't sacrifice taste or texture by settling for the precooked variety.  I poached the whole shrimp in white wine, water, and tarragon over medium heat.  Fill the pot with enough liquid to fully cover the shrimp, and add a couple tablespoons of fresh chopped or dried tarragon.
Step 2: Slice the shrimp.  Our shrimp were medium sized, so I cut them into thirds.  Put into a bowl and mix with mayo and sliced scallions.  I add enough mayo to coat the shrimp, but not overdo it.  For this recipe we had 2 lbs of shrimp and I used about 1/2 - 3/4 cup of mayo, and 3 sliced scallions.  
Step 3: Halve and toast the english muffins, then set on a cookie sheet.
Step 4: Spoon the shrimp mixture onto the muffins.  Top with grated cheddar cheese.  Place in a 375 degree oven for about 8 -12 minutes, or until the cheese is nicely melted.
Delicious shrimp melts in bite sized portions!  I also enjoy making this is larger quantities and sandwiching between some thick rustic bread for lunches.  Reheat in the toaster oven at work and it's just as good.

Monday, November 15, 2010

Swedish Meatballs

No need to buy the frozen bag from Ikea, make your own Swedish meatballs!  The key to the flavoring that differentiates these from their Italian counterpart is nutmeg.  No oregano for these puppies.  So here's how it works.

1. Rip up a slice or two of white bread into small pieces and soak in about a 1/4 cup of milk.
2. Chop 1/4 - 1/2 cup of onion and saute in butter until softened.
3. Combine bread/milk mixture with 1 lb ground beef, 2 egg yolks, onion, 1 tsp nutmeg, salt and pepper
4. Mix, form into meatballs, and brown in a skillet on all sides until almost cooked through.
5. Transfer to an oven-proof dish and bake in a 250 degree oven to finish cooking through.  
6. Add 1/4 cup flour or corn starch to the pan drippings from the skillet to make a roux.  Slowly and in small portions, add a 14 ounce can of beef broth, constantly stirring over low heat.  As the sauce thickens, add 1/4 cup of heavy cream.  I added some salt, pepper, and fresh thyme from my herb garden for flavor.  
7.  Pour the sauce over the meatballs in the oven and bake for another 10 minutes.  Then plate and serve!


I'd recommend mashed potatoes, or egg noodles to accompany these meatballs. 

Thursday, September 16, 2010

Tomato and Feta Sandwich

This is what happens when you spend a couple weekends out of town and are going out of town again soon so you don't want to go grocery shopping.  You end up needing to finish the last of the bread, the feta cheese that's been around for far too long (no mold i promise!), and tomatoes are the only thing in your produce drawer.  Wait, I'm the only one this happens to?  So we got a little creative with last night's dinner.  Open faced tomato and cheese sandwich!

Slice the tomatoes, coat with salt, pepper, and dried basil.  Coat a heated saute pan with extra virgin olive oil and balsamic vinegar.  Add the tomato slices.  Cook about a minute on one side.  Flip over.  Put the feta cheese on top to heat while you cook for another minute.  Transfer tomatoes to a piece of toast and drizzle remaining balsamic/oil pan drippings over tomatoes/toast.  And there you have it.  A pretty lame dinner.

Tuesday, August 31, 2010

Sliders!

Bacon Teriyaki, Bernaise Balsamic, Bacon and Blue
I'm just a little bit excited about last night's dinner.  Craving a burger on the way home from work I realized, "I've got some ground beef in the freezer, I'll make my own!" and thus...sliders!  And here's the fun part about sliders, you can make a few with different flavors so you don't have to choose just one type of cheese, or one type of marinade for the beef (Yes, I do in fact marinade my beef).  So here's the lowdown:

For the burger patties: Ground beef (I used 80/20), diced mushrooms, diced garlic, marinade (add diced onions if you have any...I didn't)
My two marinades: Balsamic vinegar or Teriyaki/soy sauce/sesame oil/sesame seeds
Cheeses: Roquefort, Parmesan, Cheddar, Feta (not pictured)
Toppings: Bacon, Scallions
Sauces: Mayo, Bernaise
Bread: Tuscan Pane (from Trader Joe's) lightly toasted

I enjoy marinading my ground beef to add flavor in the burger when you bit into it.  I opted for two marinades last night: a balsamic and a teriyaki.  I also enjoy throwing diced mushrooms and/or onions in with my ground beef to cook within the burger itself.  Another dimension of added flavor and texture.
Ground beef, garlic, mushrooms, balsamic.  Don't be afraid to get your hands messy when you mix it all together.  
Once your beef is mixed to your liking, form small patties with your hands.  If you have trouble with the meat falling apart you can add some egg and milk, but your burgers will taste a bit like meatloaf, if you're cool with that.  Not wanting to use my grill pan, I again opted for the skillet cooked burgers.
It's important not to squish your burgers down as they cook, no matter what surface you're cooking them on, because that's how they lose all their good juices from the inside and you're left with a dry, unappealing burger.  You can squish once they're in the bun.  So cook these, turning over periodically until they're cooked through to your liking.  When almost done, you can add the cheese on top to melt before assembling your burgers.  I also like using bread instead of hamburger buns because I don't have to buy something special for these, and I actually love the taste/toasty texture.

So what were my final creations?  At the bottom of the first picture is your classic "bacon and blue" with the Roquefort cheese, bacon, scallion, and mayo.  This used the balsamic burger.  Going up clockwise we have a traditional bacon burger with cheddar cheese and mayo.  This utilized the teriyaki burger.  And my favorite of the night was the balsamic burger topped with parmesan, scallions, and bernaise sauce (bringing the steakhouse to the burger joint).  I had a ton of leftovers, so I must admit I nibbled later on a balsamic burger topped with feta, scallions, bacon, and bernaise sauce sans bread. 

Proof that you don't need a grill and don't need to settle on a single burger for dinner.