Showing posts with label red onion. Show all posts

Monday, December 24, 2012

Duck with a Plum Marmalade

We cut this recipe out of the newspaper years ago, and it is always a crowd pleaser.  Duck seems like such a decadent meat, probably due to the fatty skin, and a rich marmalade really complements it nicely.

Marmalade Ingredients: 1/2 cup diced red onion, 1 tsp minced garlic, 2 large plums diced, 2 tbsp brown sugar, 1/2 cup chicken broth, 1/4 cup balsamic vinegar, salt/pepper

Begin with the marmalade since it can be made a day ahead of time, or it can sit while you cook the duck.  Add your onion and garlic to a tbsp of olive oil to saute.
Once softened, add the plums.  Now we had trouble finding fresh plums in November, so we went with canned plums.  These work well since you're using them for a sauce as opposed to eating whole.  Don't go with dried plums.  We did find fresh pluots, which would also substitute nicely.  
After a few minutes when everything is nice and soft now, add the brown sugar then the broth, vinegar, and salt/pepper.  
One of our diners is allergic to balsamic so I cooked it with just the broth first, then once reduced, portioned some out for her and added the balsamic to the rest of the ingredients.  Cook for several minutes until the sauce is very thick...like a marmalade...that's when the flavor is strongest and the broth/vinegar are reduced enough.  
You can set aside the marmalade until ready to serve, or cook the duck concurrently, but if you cook the duck at the same time, make sure the duck doesn't finish before the sauce because either your duck will get cold, or you'll be forced to overcook it...neither one ideal.  

For the duck, season both sides with salt and pepper, heat some butter and olive oil in a skillet and add the duck breast, skin side down to begin searing.  
Cook for about 5 minutes on the skin side over medium/high heat.  There may be some splatter, so feel free to cover the pot with a splatter shield, but don't cover with a lid just yet.  Once you can see some of the meat above the skin cooking, flip the duck to heat the other side.  Cook at this point until your desired doneness.  I prefer my duck medium rare, so I char both the fat and the meat, then flip back over to the skin side and put a lid on the skillet for another 2 minutes or so to allow the heat to cook the insides.  

To serve, slice each breast and fan out the pieces on the plate.  If at this point you find your duck is undercooked, go ahead and place the slices back in the skillet over medium heat, but only heat on one side, so the remaining side stays pink, yet you maintain proper cooking.  Spoon the marmalade over the duck or to the side.  We served with rice and brussels sprouts and the marmalade tasted nice on the sides as well as the duck.  

Sunday, October 7, 2012

Stuffed Cabbage

I inherited some cabbage awhile back and not having used it before, I decided to follow some Russian influences and make some stuffed cabbage.  The key for this dish is to boil the cabbage first so the leaves are malleable as you go to stuff them.  Then what you stuff them with is entirely up to you.  I used chicken, rice, and veggies for mine.

So first up, cut the cabbage in half and add the halves to boiling water.  You will lose the integrity of some of the leaves for wrapping, so some wraps may involve 2 leaves instead of 1.  But do be sure you split the cabbage in half lengthwise (so the stalk gets cut in half, otherwise every leaf will be cut in half.
Meanwhile, prepare your filling.  I cooked brown rice according to package instructions, and sauteed some red onions, mushrooms, and garlic in a little olive oil.
Once softened I removed the veggies to the sauce pan containing the rice and sauteed my chicken which I had chopped into 1/2 inch cubes.
Once the chicken was fully cooked, I transferred it too to the rice and veggies and made sure everything was nicely mixed.  I also added diced fresh tomatoes, chopped scallions, salt, and pepper.  
By this point, the cabbage was fully boiled (at least 20 minutes, but longer depending on how cooked you like your cabbage).  Carefully remove the hot cabbage from the water and when cool enough to handle, separate the leaves into individual "bowls" for stuffing.  To each leaf I added a spoonful of my stuffing and topped with freshly grated cheese.
At this point, roll them like a burrito and the next step is at your discretion.  I placed them seam-side down back into the skillet to char a little bit, but also heat through.  You could also put them in a baking dish and put them in the oven for 10-20 minutes.  I added a little broth to get a little steaming action going on, but if you have a sauce prepared, such as a tomato sauce, creamy bechamel, or something else you prefer, you can cook the wraps in the sauce.

To serve, I plated my wraps and added a dollop of sour cream (which is often served with stuffed cabbage at Russian restaurants, only it is a slightly different consistency than the sour cream available in US supermarkets).

Tuesday, July 31, 2012

Salmon and Collard Greens

I inherited some collard greens recently, and never having cooked them before, I decided they obviously needed to be wilted with bacon grease.  We couldn't make this dinner too healthy, could we?

First I cooked the chopped bacon and removed it from the pan to a paper towel, then utilized the grease to cook the chopped red onion and garlic.
Once softened, I added the freshly washed collard greens to the skillet.  I ripped them up a little, but you don't need to chop them too finely because once they wilt it will be like nothing is left of the original leaf.  
After a few minutes the greens will become wilted.  You can also add some water or broth to aid in the wilting process if you're low on grease/oil.  
At this point I added some chicken broth and then put my salmon on top of the collard greens to let the greens continue to stew and the salmon could be steamed from the heat of the greens.  
I put a lid on the skillet and cooked for about 10-15 minutes to allow the fish to cook and the collard greens to soften more.  Once done I cooked without the lid to allow the last of the broth to evaporate.  I then mixed the bacon back in with the collard greens and plated them with the salmon.  

Wednesday, June 13, 2012

Teriyaki Shrimp over Israeli Couscous and Endive

Trader Joe's offers a new Harvest Blend product featuring Israeli couscous, red and green orzo, split dried garbanzo beans, and red quinoa.  I decided to try this new mix, but obviously needed something with more flavor to serve atop it.  I had some shrimp, veggies and teriyaki, so figured that would be a bold enough taste.  And for good measure I threw some belgian endive leaves on the bottom to add a little fresh crunch.

Saute your veggies as per usual.  A little mushroom, red onion, and garlic in olive oil is what I went for this time.
Add the shrimp and then the teriyaki.  As the shrimp cooks it will draw in the flavor.  Add more teriyaki as desired for a saucier product.  Or for a less strong taste, add some broth at this point to cut the flavor of the teriyaki.
Assemble your endive on the plate.  You could chop it up if you want it to be more salad-like, but I also utilized these as little handheld cups of couscous and shrimp.  Very graceful.
Pile your grains, rice, etc. on top.  Then you just top with the shrimp mixture and let the juices seep in.  This way you get your salad, grains, and fish all in one bite!

Saturday, June 9, 2012

Burritos

What's better than a meal you can eat with your hands, and is teeming with flavors and ingredients?  For when you don't want to be constrained by forks, burritos are a sure bet.  If you really want to do these right, I recommend getting large, thin four tortillas that are easily foldable.  I did not have those.  All you need to do next is choose your fillings and go to town.  I went with ground beef.
For this meal I began by sauteing the ground beef with some red onions and corn.  Once fully cooked I added the taco seasoning.
If you don't mind the extra fat contact, skip the part where the taco seasonings tell you to drain the fat and add water to the beef.  It tastes way juicier if you use the meat fat.  But if you don't want a complete calorie bomb for dinner, go ahead and ditch the fatty juices.

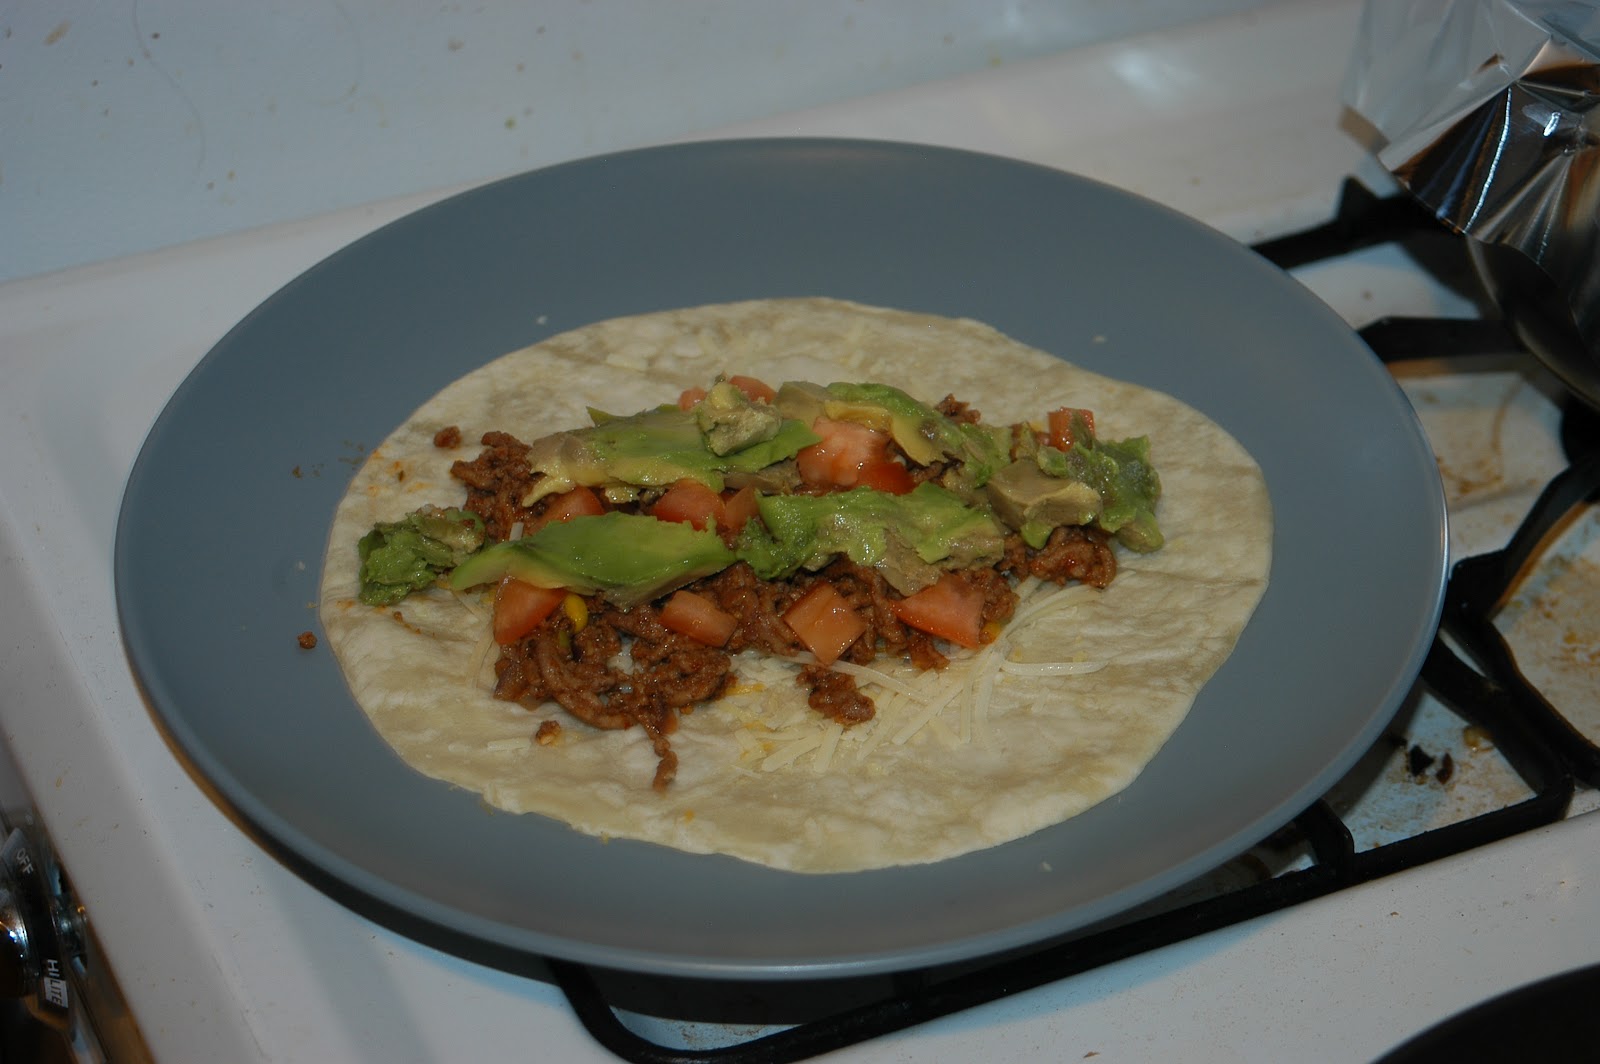
Once your meat is cooked, assembly is all that is left.  To prepare the tortillas, put them in the oven on low (200 degrees or so) to warm and soften them.  You can do this while the meat is cooking.  Then grab a plate and throw on your toppings.
Add the cheese to the warm tortilla so it will slightly melt and then be melted again by the heat of the beef.
If adding beans or rice, add them next before the meat.  I was lacking beans and I also forgot about the rice until the end so it was added a little out of order.
Cold ingredients come next.  Starting with the tomatoes.  And followed by the fresh avocado.
You can also do pico de gallo and guacamole in lieu of tomatoes and avocado, but at this stage add whatever veggies you want.  Lettuce works too.  
 Here's the rice I forgot to add earlier.  
The final touch is anything saucy.  I added sour cream and some salsa verde.  Then all that is left is to fold and wrap.  Fold the two sides in so they touch the toppings.  Grab the back flap and pull it over and around the innards, pushing the fillings inside as much as possible.  Continue to roll until your wrap is complete.  As you can see in the first image, my burritos were a tad overstuffed for these tortillas, so I had to keep one end open.  As long as you have one burrito butt to avoid food getting all over your hands you should be good. 

Monday, May 28, 2012

Potatoes, Shrimp, and Veggies over Rice and Lettuce

This was an interesting dinner I made about a month ago.  For some reason I was craving potatoes (well, aren't I always?), but also kind of wanted something fresh and salad-like.  So I figured I'd assemble pretty much everything fresh in my fridge on top of lettuce, but added some rice for texture and substance.  It was pretty good.

Ingredients: Romaine lettuce, tomato, cucumber, potatoes, basmati rice, shrimp, red onion, garlic, tarragon, cumin, coriander, salt/pepper, yogurt sauce to garnish

Start by peeling and chopping your potatoes.  I chopped into ~1 inch cubes, but do whatever you prefer.  Then, just as if I was preparing breakfast potatoes I cooked them in the skillet with a little bit of olive oil and added the tarragon, salt/pepper, cumin, and coriander.  Let them cook for about 20 minutes to cook through, and if you want you can periodically add a little broth that will be absorbed and soften the insides. 
Once primarily cooked, I added the red onion, a little garlic, and the shrimp to the pan.  Saute until the shrimp are pink and the onion softened.  I opted to chop my shrimp for the sake of having more shrimp scattered throughout in smaller bites.  It makes the shrimp go further.
Once cooked through you can assemble your meal.  I layered lettuce on the plate first, covered with the rice (it was leftover from a previous dinner so I just reheated it), piled the potatoes/shrimp on next, topped with fresh cucumber and tomato slices, and finally drizzled the sauce over.

The sauce was also leftover from a previous meal (see: Salmon w/ a Zucchini Yogurt Sauce).  It's basically a combination of 1:1 yogurt and mayo.  Then you throw in diced zucchini and chives, but really you can add whatever you like.  Or make your own yogurt sauce. 

So this dish is kind of like a salad, kind of like an mediterranean burrito bowl, but the combination of hot/cold, heavy/light makes for a tasty, hearty meal.

Tuesday, February 28, 2012

Pesto Chicken Sandwich

Today I have yet another delicious lunchtime sandwich option for you all.  I was craving some chicken pesto the other night, but decided it was more of an afternoon meal, so the next day I went to town.  Pretty much all you need for this is chicken and pesto sauce and the rest of the accompaniments are up to you.  I would've liked some avocado or maybe some lettuce or fresh tomato, but alas you use what you have, and here is what I made given the ingredients in my fridge.  Granted, it was still obviously a delicious and decadent sandwich.   

1. Toast your bread.  I went with sourdough. 
2. Cook your bacon.  I did this in a pan on the stove. 
3. Cook your chicken.  I used two chicken breast tenders which I first seared in the bacon grease, but then ultimately poached in a little broth/water combo.  This was to make sure it would cook through and remain moist.  When it was pretty much done, most of the liquid had evaporated so I spread a thick slab of pesto on top of the chicken, put the lid on the saucepan and cooked another 3-5 minutes.
4. Assemble.
On one slice of the bread I placed some red onion slices, covered with my bacon strips, and crumbled some herbed goat cheese on top.  On the other slice of bread I spread a coat of mayonnaise, placed my two chicken slices on top, and shaved some fresh parmesan cheese onto the still hot chicken so it would melt. 

Carefully flip over one of the sides of the sandwich.  Press together lightly, slice on the bias, and enjoy this cheesy, pesto-ey, meaty deliciousness. 

Tuesday, November 15, 2011

Chicken Pesto Crepes

The other night I was craving crepes, but not interested in going to a restaurant, so I obviously had to make them at home.  Turns out they're quite simple and quick.  Prepare your batter, then prepare your fillings.  Cook the batter, fill the crepe, eat.  

Crepe Batter: 1 egg, 1/4 cup flour, 1/3 cup milk
Fillings: Chicken, red onion, corn, pesto sauce, cheddar and goat cheese

That amount of crepe batter made 3 crepes.  Mix all the ingredients and make sure there aren't any lumps.  Then make sure your filling is completely cooked.  I sauteed the chicken, onion, and corn in a  skillet and then added pesto sauce.  Set aside.  
Heat your nonstick skillet over medium heat and lightly butter the bottom.  Add 1/3 of your crepe batter and swirl it around the entire bottom of your pan. 
Once partially cooked, but obviously cooked through on the bottom (about 1 minute), flip. 
At this point, add your filling mixture.  Like with a quesadilla, I start with the cheese so that it will melt and then put my chicken mixture over it. 
Once melted, transfer to a plate by folding however you'd like.  I went for burrito-style rolls, but you can do triangles, folds, whatever your heart desires. 

Sunday, October 30, 2011

Teriyaki Shrimp Fried Rice

What do I do when I have leftover rice? Stir-fry!  It's a very simple and quick dinner.  Take the meat and veggies you have, choose your sauce/spices, heat it all together, and you're done.

I started with a little garlic and chopped red onion in some butter.  Then I added the asparagus.  After about 5 minutes I added corn and spinach and the raw shrimp.  After everything was sauteed to my liking, I pushed the veggies/shrimp to the side of the pan and added the already cooked rice to the skillet.  I let it cook a little in the butter and then added teriyaki sauce.  After another minute or two I mixed everything together and cooked over medium-high heat to give the rice a nice little crunch.

Finally, I pushed the rice/veggies/shrimp to the edges of the skillet and in the middle I cracked an egg.  I scrambled it by itself and when it was fully cooked I mixed it all together.  I added a little more teriyaki sauce to my liking, and in about 10 minutes I had a fully seasoned, fresh cooked stir fry dinner.

Saturday, October 8, 2011

Balsamic Marinated Steak with Pesto Mashed Potatoes

I bought these weird thinly sliced steak strips that called themselves sandwich strips.  I figured I'd marinate them, grill them, put them between some bread, and do the whole sandwich thing.  Well, my bread went bad, but I was hungry, so I figured I'd treat these steaks how I normally would a skirt or a flank steak.

I went for a balsamic-based marinade, so into the ziploc bag went the balsamic vinegar, salt/pepper, rosemary, garlic, and a touch of olive oil.  Into the fridge it went while I sliced some red onion and scallion (onion overkill? probably. but they were all i had in terms of complimentary produce).

I then made some mashed potatoes, because nothing goes better w/ steak than potatoes.  I mashed with cream cheese and pesto sauce, rather than milk and cheese, for a little variation.

Finally, it was time to cook the steak.  It took about three minutes since it was so thin, and I didn't want to overcook.  Heat the skillet over medium-high heat.  Add your steak, red onions, and the juices.  Cook the steak about 1-2 minutes per side.  Turn over, repeat.

Plate your mashed potatoes, lay your steak atop them, and drizzle with some of the red onions and reduced balsamic vinegar marinade.  Garnish with some fresh scallions if you're feeling like your breath won't be pungent enough already.

Monday, October 3, 2011

Spiced Shrimp with Avocado Corn Salsa

My friend hosted a dinner party last weekend and I volunteered to bring an appetizer.  The entree was turkey chili, so I wanted something that could compliment that and provide a little something different.  Now I'm embarrassed to say I did not take a picture of my finished product (mostly because it was in her kitchen surrounded by people I just met and I didn't feel the need to whip out my camera to document a bowl of shrimp).  So here's a stock photo from the internet, but if you look below you can see the blurry image of my bowl of salsa with shrimp dangling around the rim!
Look at that lovely bowl of appetizer holding it's own amidst a sea of lavish tableware.  Ok, enough about my lack of photography, here's how you make it.

Take your raw, peeled, deveined, butterflied jumbo shrimp and put them in your dry rub with a little olive oil and garlic.  I used cayenne pepper, paprika, ground coriander, dried oregano, cumin, pepper, diced garlic, extra-virgin olive oil.  Toss the shrimp to coat and place in the fridge until ready to grill (at least 30 minutes). 
Next prepare the salsa.  Dice your red onion and tomato first.  Then add your corn and chopped scallion.  I added the avocado, cilantro, and lime juice last, so as to avoid browning of the avocado.  Again, toss to coat and store in the fridge until ready to serve.  
I brought the uncooked shrimp and salsa to the dinner party and grilled the shrimp on the stove there.  You don't really need to oil the skillet since there's oil in the shrimp marinade.  Using tongs and a grill pan, cook about 2-3 minutes on each side until the shrimp is cooked through.  Arrange shrimp surrounding the salsa.  Rather than scoop the salsa with the shrimp and eat with your fingers, I recommend a fork.  The spiciness of the shrimp coupled with the cool and citrusy salsa make for a perfect pairing, and also go nicely before a hearty turkey chili. 

Sunday, July 24, 2011

Black Bean, Corn, and Tomato Salad

This salad fix I seem to be on is getting a little out of hand (yes, 2 salads constitutes a fix).  This one was made for a picnic and was primarily consumed atop chips, like a salsa.  It's one of my go-to picnic dishes because it's quite simple.

Combine 1 can black beans, 2 diced fresh tomatoes, 1 cup corn kernals, 3/4 cup diced red onion, and 1/2 cup loosely packed chopped cilantro.  Now again, I never measure these recipes, so that's approximate.  Add more or less of the items you like. 

For the dressing I add a little cumin and coriander (probably about 1 to 2 tsp worth of each) and fresh lime and lemon juices.  Just enough to coat the salad but without leaving a puddle of juice in the bottom (probably 2 to 4 tbsp total citrus juice).  And that's it!  Toss and serve.

Pro tip - I do find that the juice from the can of beans and the freshly chopped tomatoes can accumulate in a less than desirable fashion.  To deal with that, I poured the beans and chopped tomatoes into a sieve while I cut the onions and cilantro.  I was amazed by how much liquid dripped into the sink, but I find that the extra five to ten minutes I allowed for drainage really improved the overall taste and texture of this salad later.

Sunday, July 17, 2011

Quinoa Salad with Shrimp

What?  Salad for dinner again? Yeah, don't worry, I'm not turning healthy, as evidenced by the bacon overload.  But the first time I sampled quinoa it was in a salad and I was sold, so rather than serve it as a side dish, I present to you quinoa as the main event.  Perhaps this would make a great lunch salad.

This one is pretty simple.  As you may be able to tell, I was lacking in the lettuce department, so it's heavy on the quinoa, light on the greens.  I cooked the quinoa in chicken broth and threw the raw shrimp and frozen corn kernels into the pot to cook together.  I created a dressing with olive oil, red wine vinegar, salt and pepper, and cilantro.  To that I added the cooked quinoa, shrimp, and corn and mixed to coat.  I added the lettuce, chopped red onion, herbed goat cheese, and of course the crumbled bacon.  And there you have it.  Add quinoa to any of your favorite salads and you'll get a nice texture addition.  Though you probably want to add a lot less than I did if you're just using it as an accent flavor.  

Wednesday, July 6, 2011

Shrimp Quesadillas with Mango Salsa

This was the featured dinner item at my 4th of July shindig this year.  We spent all day stuffing ourselves with chips, guac, cookies, and a failed attempt at frozen yogurt, so we really weren't all that hungry.  Thus something simple and quick to hold us over before the fireworks.

Sadly, I do not have any more pictures for you.  So imagine if you will, a skillet on medium heat.  Take your flour tortilla and place it in the skillet to warm it on the side that will be holding your fillings.  Remove said tortilla and lightly butter your skillet.  Place the tortilla back in the pan, this time facing the other way so the outside is cooking nicely in the butter.  Having a pre warmed interior means faster cook time, which results in a less burnt exterior.

You can add your cheese almost immediately and watch it melt.  I then added shrimp which I poached in chicken broth, but you can use any pre cooked shrimp you have.  After only a minute or two the cheese should be mostly melted.  You can put a lid over the skillet for 30 seconds or so.  Then fold the tortilla over, heat about another 30 seconds, slide onto a plate, and slice into thirds.

No microwaves or toaster ovens allowed.

The salsa is much more exciting.  Get a fresh mango.  Chop it into small cubes.  Similarly chop some red onion and cilantro.  Put it all togeter with some fresh lime juice and toss to coat.  Proportion to your own tastes.  I had about 1/3 cup red onion, 1 1/2 to 2 cups mango, 1/3 cup cilantro, and maybe a tbsp or 2 of lime juice.

Serve as a garnish with chips, dillas, or any white fish, especially if the fish is blackened or spicy because the mango and lime provide a nice contrast.